Category: Uncategorized

  • How to Make Your Own Wrapping Paper: Beautiful Holiday Gift Wrap DIYs

    This content may contain affiliate links. See my full disclosure here.

    This post shares ideas for how to make your own wrapping paper, including beautiful holiday gift wrap DIYs! Oriental Trading provided the materials to complete this project.

    Did you see my post last week about 5 tips for holiday decorating on a budget? If you’re a crafty guy or gal, number 5—homemade gift wrap—is right up your alley. That’s what I’m talking about today.

    And don’t think that pretty custom gift wrap is just for real presents—you can use it as a cheap and easy decor idea, too. Just grab some old boxes (if you have Amazon Prime you probably have approximately 1,000 at any given time) and to create some budget-friendly holiday decor pieces.

    I teamed up with Oriental Trading to chat about how to make your own wrapping paper by putting together five beautiful holiday gift wrap DIYs. Although Oriental Trading sent me some of the craft supplies I used during this project fo free, all experiences are my own. I’ve also linked to the supplies I used from Oriental Trading below so that you can grab them for yourself!

    *Note: I suggest wrapping the presents first, then customizing the wrapping paper. That way you can see exactly where your design is going!

    Use painter’s tape to tape off one side of your gift. Use scrap paper to cover the side you don’t want painted. After painting, remove the tape to reveal the dipped design. I also added burlap ribbon to this package.

    This one is messy! Take your present outdoors, or lay down a drop cloth. Put paint on your brush and flick it onto the present. Let dry. I love how easy this technique is, but it’s really cool. And every present you do will be a bit different.

    Even if you aren’t a painter, simple brushed designs look lovely, especially on the brown paper. Trees, stockings, candy canes, and various stars are all pretty easy to do. To get a “brushed” look, avoid putting too much paint on your brush. Dab off extra paint on a paper towel.

    Use metallic washi tape to create designs on packages or paper bags. You can create geometric designs, or you can treat the Washi tape like it’s ribbon by wrapping it around the present and sticking it in place.

    You can also use Washi tape on gift bags to customize them and add more interest. Bonus points for double up two techniques on a paper bag: Washi tape and simple brushed designs.

    Like these custom gift wrap ideas? Check out my easy paint stirrer Christmas tree ornaments, my DIY marbled clay Christmas ornaments, and my simple wood bead ornaments!

    Tuck small pine branches, rosemary sprigs, and pinecones into your ribbons for a beautiful, natural look. You can tie pinecones in place, or you can glue them.

    For more celebration posts, check out my tips for painting dollar store foam pumpkins, my DIY scrapbook paper and yarn party hats, and my DIY balloon garland tutorial!

    Share my ideas for how to make your own wrapping paper on Pinterest!

  • Cricut Wood and Chipboard Projects: 15 Great Projects to Make Today!

    This content may contain affiliate links. See my full disclosure here.

    This post shares 15 Cricut wood and chipboard projects you can make using your Cricut Maker’s Knife Blade or your Explore Explore Air 2’s Deep Point Blade!

    Hey gang! Today I am sharing a roundup of 15 awesome Cricut wood and chipboard projects to inspire you! If you’ve been wanting to try to cut wood with your Cricut Maker’s Knife Blade or cut chipboard on you Explore Air 2 or Maker machine, this post is for you.

    Cutting basswood (and balsa wood) is a unique ability for the Maker—no other Cricut machine can do it. I have an entire post and video all about using the Cricut Maker’s Knife Blade to cut wood if you’re new to it!

    This cute DIY wooden bookmark from Amber Oliver is a unique use of Cricut’s wood. The wood is so thin that it isn’t too big to fit between pages in a book—but it’s also a bit more substantial than just using a piece of paper. I also love the cute flowers and leaves cut-out pattern she used!

    My friend Timisha at Toolbox Divas made this cute elephant phone and pencil holder using more intricate cuts and multiple pieces that she painted and assembled. Really cute!

    We didn’t do too much for R’s second birthday—just a small little family party. But I couldn’t pass up the chance to make a cute little cake topper out of Cricut basswood. I also used the slice tool in Design Space to add a “dipped” look with holographic vinyl.

    This cute floating 3-D wooden cheers sign from Anika’s DIY Life would be the perfect addition to any party! Anika also used chipboard for this project, which we’ll talk a bit more about in a few.

    A colorful wooden summer popsicle sign from Everyday Jenny would be a really fun project to make with the kids—especially if you’re cooped up indoors schooling your kids from home and they won’t be going back until the fall! (I’m writing this in April 2020 :))

    I don’t think I’ve seen any jewelry made using the Cricut Maker and wood. These trendy wooden earrings from Mary Martha Mama are a simple project that you could also make using basswood leftovers from another project! I absolutely hate wasting any materials—especially pricier stuff like basswood!

    I love this DIY desktop organizer made using a Cricut Maker and wood from Dream A Little Bigger. Sometimes I have a hard time keeping all of my little Cricut bits and bobs organized. I absolutely love the spot in the front for all of the little blades!

    Another from ToolBox Divas—these wooden floral and fluffy sheep coasters Timisha are so cute! They have an extra decorative later added as well.

    Although chipboard isn’t wood, it can be use for projects that need a similar amount of structure. Cutting chipboard can be done on either the Maker or the Explore Air 2—it depends on the blade you’re using and the type of chipboard. For example, a deep point blade, which can be used on either machine, vs. the knife blade, which can be used only on the Maker.

    You can read all about using Cricut to cut chipboard here! In the meantime, here are a few great Cricut projects made using chipboard. Enjoy!

    These DIY chipboard cupcake toppers from Coastal Bride are the perfect simple addition to a party. If diamonds aren’t your thing, you could easily adapt this project to be anything, really. As long as it isn’t too intricate for the knife blade to cut and has a stick at the bottom!

    Turn any picture into a DIY photo puzzle with this tutorial from Dream A Little Bigger. Bonus point if you make a puzzle of your cat, because who wouldn’t want a puzzle of their cat?

    Colorful fabric-wrapped DIY chipboard desk organizers from Happiness Is Homemade are the perfect project to add organization to any craft room or workspace! And they are so easy. Fabric is optional—if that’s not your thing, you can leave them blank for a utilitarian look or paint them.

    Another DIY photo puzzle tutorial, this time from Leap of Faith Crafting. This one has biggest puzzle pieces, so it’s something that littler hands could handle. I also like that this puzzle has a base that you create the puzzle in—also good for storage once you put it together.

    I absolutely love this DIY personalized name puzzle from The Country Chic Cottage! I bought R a custom acrylic and wood name puzzle for her first birthday and she loves it. But why not make your own? Angie’s tutorial is great!

    Highly possible I am going to make something like this this year! I love these DIY wooden plant markers from Dukes and Duchesses. They turned out great, and I love the dipped paint effect she did as well.

    I made these cute monstera leaves from chipboard to put on my new workspace corner’s walls! I also cut vinyl in the same size to give them a bit of color and just added that on top. Then I put them on the wall using painter’s tape.

    Want to learn more about Cricut machines? Check out my post “Which Cricut Should I Buy?” It provides a detailed overview of the Cricut Joy, Cricut Explore Air 2, and Cricut Maker! You can also check out my detailed tutorial for using the EasyPress 2.

    Pin this post about Cricut Wood and Chipboard Projects!

  • How to make gorgeous abstract alcohol ink glass ornaments

    This content may contain affiliate links. See my full disclosure here.

    This post is part of my week of Christmas ornament DIYs series. I’m sharing 7 different DIY projects for clear ball ornaments, each of which you can complete in 30 minutes or less. Today I’m experimenting with alcohol ink to make abstract ink glass ornaments with splatter patterns.

    Day 3, let’s jump right in! Today I’m sharing my DIY alcohol ink ornaments. It’s super easy. Like, if you aren’t good at painting or crafting but you’re good at using an eye dropper, stick around.

    That’s because, as with anything “abstract,” you can’t really mess it up. I’m experimenting with stripes, drips, and splatter patterns on these ornaments.

    Step 1: Pour paint into the ornament via the opening and rotate the bulb until the entire interior surface area is covered. Put upside down in a cup to drain extra paint out.

    Step 2: Once the paint is dry, put the top and hook back on. “Paint” the alcohol ink onto the ornament.

    I took a few different approaches: for some, I squirted the ink onto the top of the ornaments and let it drip down. Some I flipped the ornament upside down and let the ink drip “up.” On others, I did squiggles around the ornament for a more abstract look.

    Like these? Check out my easy DIY glitter ball ornaments, my DIY marbled clay ornaments, and my DIY acorn and wood bead garland!

    Step 3: You can hang them to dry, or if you’re pouring an ornament that’s upside down, just let it dry in place.

  • 21 easy and gorgeous clear Christmas ornament ideas!

    This post shares 21 gorgeous clear Christmas ornament ideas! These ideas are very easy and will help you add a personal touch to your tree this year. This post originally appeared on bybrittanygoldwyn.com.

    If you’re popping in for the first time today or missed my week-long series of DIY ideas for clear ball Christmas ornaments a few weeks ago, I’m rounding them up today for a second go. Plus I’m adding a bunch of other DIY clear Christmas ornament ideas from some other bloggers.

    There’s still time to create some custom ornaments for your tree this year, especially because each of these is easy to make. Most can be done in under 30 minutes, and most use supplies you can easily find at your local craft or grocery store. (Or Amazon if you’re lazy like me.) So let’s run through them!

    These glitter ornaments are so easy but so beautiful. They use floor cleaner (yes, floor cleaner!) to achieve a beautiful glittered effect. Best of all, the glitter is contained on the inside of the ornament, so it doesn’t shed all over your house.

    That’s why I call them *almost* no-mess glitter ornaments. You’ll probably make a bit of a mess when you’re creating them because glitter is seriously impossible to contain. But once the ornaments are sealed, the glitter is sealed, too.

    These easy red and white ornaments by my friend Toni at Girl Just DIY are really cute and easy to throw together. You could easily customize them by switching up the colors, ribbons, or designs.

    These DIY Glitter Ornaments by Jennifer Rizzo are perfect for those of you who like the glitter ornaments, but don’t like glitter that much 😉 They have a cute dipped effect, and the glitter is on the outside of the ornament.

    These winter-themed ornaments use the kind of clear ball ornament that can be broken in half. I used some paintable fake snow on the inside of these and added pinecones, eucalyptus, and some very fine white glitter.

    The faux snow will help the natural materials in the inside stand out while on the tree. I didn’t want them to just blend in to the green tree.

    These Easy DIY Coastal Christmas Ornaments from My Wee Abode use rope and an ombre effect to create a coastal-inspired look. I love how the rope gives these a natural feel. I’d love these left unpainted, even.

    Absolutely loving these living Christmas ornaments by Chatfield Court. These would make an amazing hostess gift or takeaway gift from a party.

    DIY Fabric Wrapped Christmas Ornaments from 2 Bees in a Pod are the perfect way to use up fabric scraps, too. I have some fun fabric I want to try these with this year using modpodge.

    I have been wanting to try alcohol ink for a while. I was worried about the black coming off as brown, but this stuff is awesome. Super pigmented. I liked the metallic colors, too. I love the abstract graffiti-like patterns the ink made on these ornaments. My favorite is the one in the second pic.

    These Grinch bath bomb ornaments from Shrimp Salad Circus are the absolute best! I love any gift that is consumable (the bath bomb) and reusable (the container for the bath bomb). I’d love to make these as gifts.

    My friend Colleen is so good at hand lettering! She customized some simple ornaments using white and gold. If you can’t hand letter (like me…) you can fake it with printable vinyl cut in a brush script.

    Check out these DIY Sea Glass Ornaments from Charleston Crafted. If you want a coastal vibe, these are perfect. Definitely check out the finish ornaments. If this color isn’t your thing, you could easily swap it out for another.

    This is not a new technique, but I couldn’t wait to try it. I’m really pleased with how they turned out, too. I used a simple paint pour technique to create a faux marbled effect. Using metallics along with the flat colors also turned out great too.

    Another from my friend Shrimp Salad Circus…this Christmas ornament Advent calendar DIY is so cute! The bead adds such a cute touch. I love Lindsay’s style and am already brewing on an Advent calendar idea after seeing this one.

    For these ornaments, I used a thick texture paint for the first time. I was worried they’d take forever to try, but the paint is designed to keep its shape and dry in a normal amount of time. What do you think? I think they turned out beautifully.

    Like these? Check out my DIY marbled clay ornaments, my paint stirrer Christmas tree ornaments, and my DIY wood bead ornaments!

    Red and silver marbled ornaments are a beautiful way to add a bit of glamour to your tree while keeping more traditional colors.

    Another from my pal Lindsay at Shrimp Salad Circus. These cute galaxy and planet Christmas ornaments also use a paint-on-the-inside technique.

    Not my first time working with gold leaf—I love it! It’s messy but always beautiful and usually pretty forgiving. I used gold leaf sheets for this project, not liquid gold leaf.

    Another beautiful fabric scrap ornament that you can make in minutes. And what crafter doesn’t have scrap fabric laying around?

    DIY beach Christmas ornaments are a beautiful way to easily bring some coastal charm to your tree. These ones from my buds at Charleston Crafted are perfect for them—they live right by the beach.

    And last but not least, these stovetop potpourri ornaments do double duty. They look beautiful on your tree, but when you’re ready to use them, you can open them and dump the stovetop potpourri into a pan.

    I love using stovetop potpourri in the fall and winter. You can even use scraps, and it makes the house smell amazing.

    These pretty easy mercury glass Christmas ornaments from Chatfield Court use mirror effect spray paint to achieve a mercury glass effect.

  • How to Use the Cricut Explore Air 2: My Review and What You Can Make!

    This post shares all about how to use the Cricut Explore Air 2, including my review of its capabilities. This post was sponsored by Cricut and originally appeared on bybrittanygoldwyn.com.

    I’ve teamed up with Cricut to create some awesome projects and am going to be doing a series of three posts to get my feet wet using this bad boy. I’m excited to tell you my first impressions about using the Cricut Explore Air 2 machine! 

    So let’s start with some basics, shall we? If you don’t know what “Cricut” means, here are five quick facts about the machine I’m working with, the Cricut Explore Air 2.

     %postname%

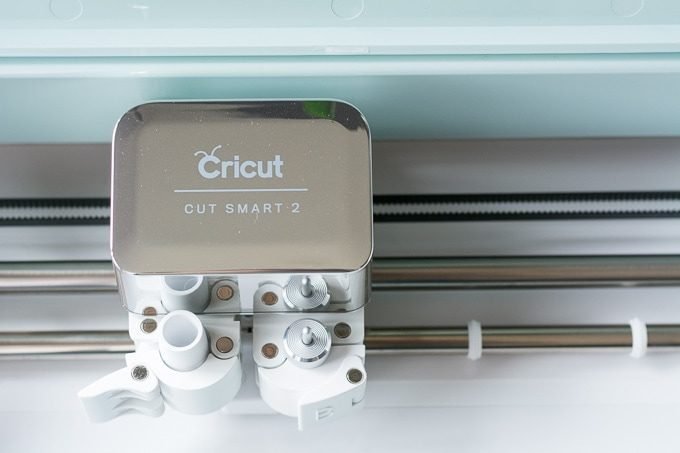
    You might know Cricut as that company that makes cutting machines. And you’d be right. But this machine doesn’t just cut—it writes and scores for you, too. Hey Let’s Make Stuff has a great tutorial on how to address envelopes, for example. No more handwriting that looks like a 7-year-old kid’s…like mine does.

    You can choose from over 3,000 ready-to-make projects in Cricut’s Design Space. You can also make your own designs in the Design Space or import designs you created in other programs (like Adobe Illustrator, PicMonkey, etc.). Oh, and you can also upload your own fonts. And have the machine do precision cuts on things you’ve printed out from your home printer.

    You’ll need an Internet connection. The setup process helps you through getting your machine connected, and it was quick and easy. Once you are connected to the Internet, you actually do most of the work on your computer (or tablet or phone) in the Design Space. The wireless connection is what gets your designs from your computer to your machine.

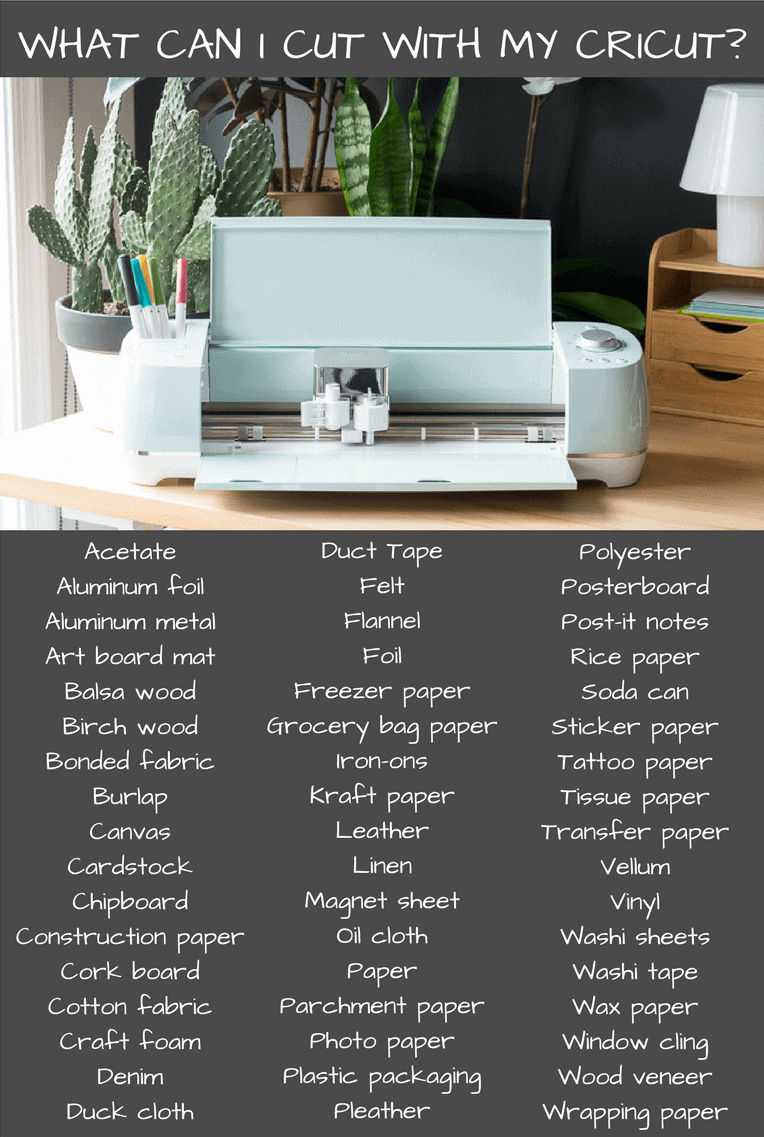
    When I was only tangentially familiar with Cricut machines, I knew they cut card stock, paper, and vinyl. I had no idea that they are actually quite the powerhouse when it comes to cutting. Here’s a list of everything this machine can cut (note that you might need a special “deep blade” for some of these materials):

     %postname%

    Although I’m still getting my feet wet with my Cricut, I think the better question would be what crafts can’t you make. I know that sounds cheesy, but I have really been blown away by the Cricut projects I’ve seen.

    And I have to be totally honest with you guys. Before digging in, my perception of Cricut was that it was mostly for moms who scrap booked, crafted with their kids, and used the machine to make cute party decor. Yes, you can do all of those things! But you can also do so much more.

    Here are a few examples of some of the projects that caught my eye in Design Space:

     %postname%  %postname%  %postname%  %postname%  %postname%  %postname%

    For more Cricut basics, check out my complete EasyPress 2 overview, my tutorial for how to slice text and objects in Cricut Design Space, and my tips for using the EasyPress Mini and iron-on material with wood!

    I’m woman enough to admit that I was intimidated by a crafting machine. Despite this, I took it out of the box and set it up the day I got it. Once I finished the setup process—which I’m not going to outline because Cricut does an awesome job walking you through it already—my first task was to complete a test project.

    All of the materials and instructions were included with the machine, and it walked me through the Design Space steps. I loved the test project because it helped me get familiar with using the machine and working in the Cricut software. But I did not love the test project because I totally messed it up. 🙁

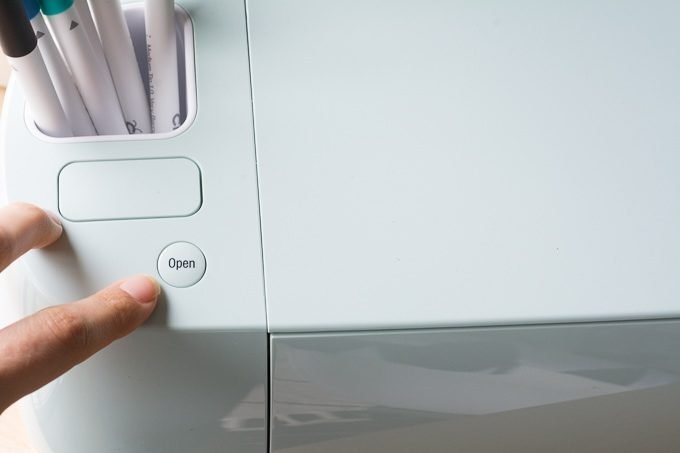
    I really should have set aside some time to go through the steps slowly, but I rushed through it and botched something, which gave me cold feet. So on my desk the new machine sat. Every day I looked at it and thought, “ugh, I still have to figure you out.” One day I finally decided to sit down, click “Open,” and do some tests.

     %postname%  %postname%  %postname%  %postname%  %postname%

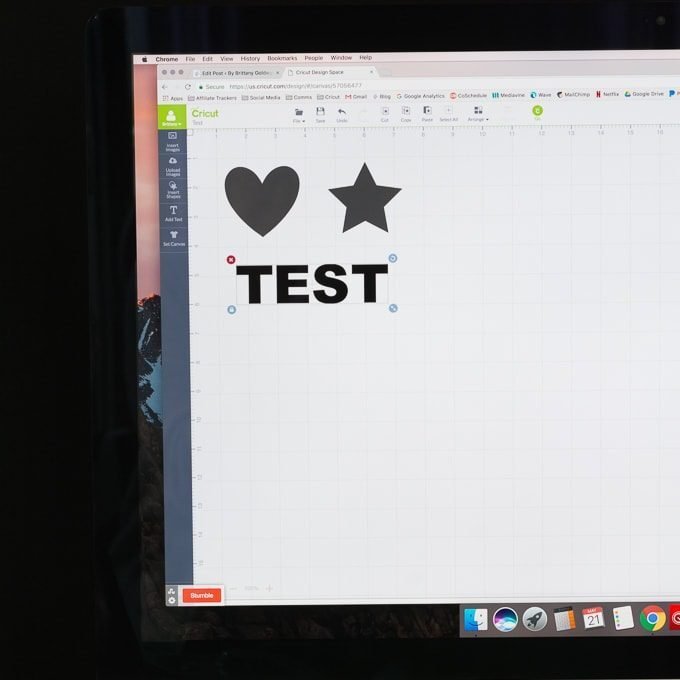
    I played around a bit in the Design Space to create a few simple shapes, including block letters for the word TEST.

     %postname%

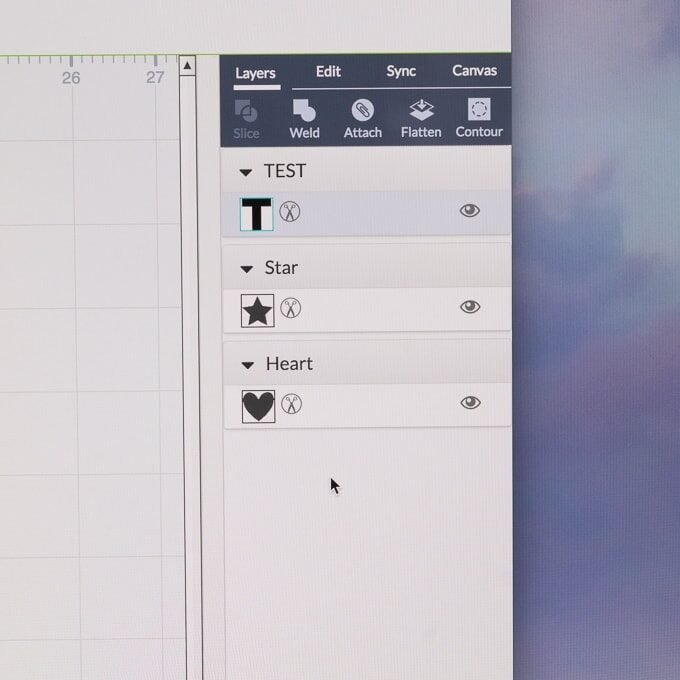
    Note in the image below that all of these are set to “cut” mode…see the little scissors icon?

     %postname%

    For an updated overview of the different Cricut machines, see my post comparing the Cricut Joy, Cricut Explore Air 2, and Cricut Maker!

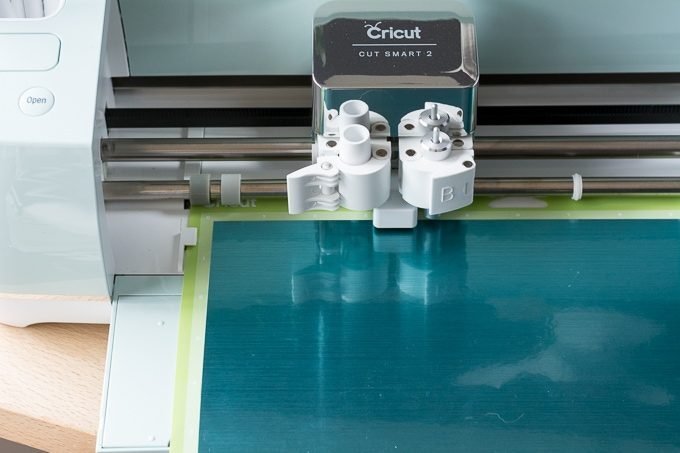
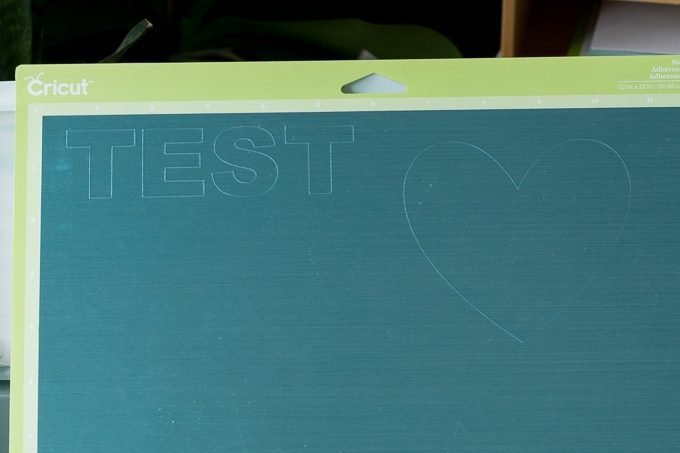
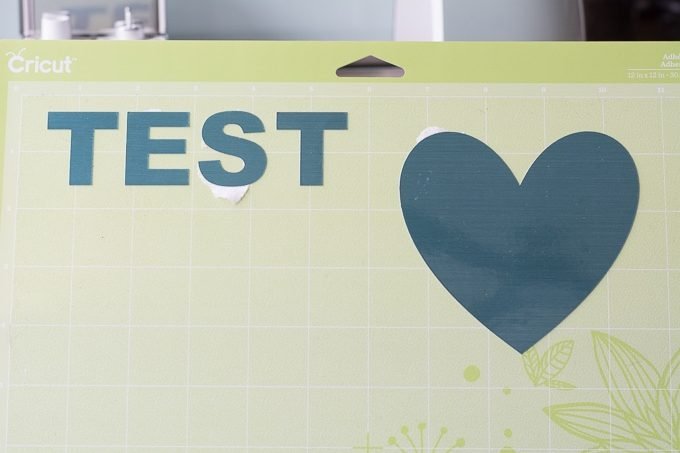
    Once I had my shapes, I loaded some metallic adhesive-backed paper to cut my shapes. I cut the TEST block letters first, then I cut a heart. I didn’t cut them at the same time, though you could do that.

     %postname%  %postname%

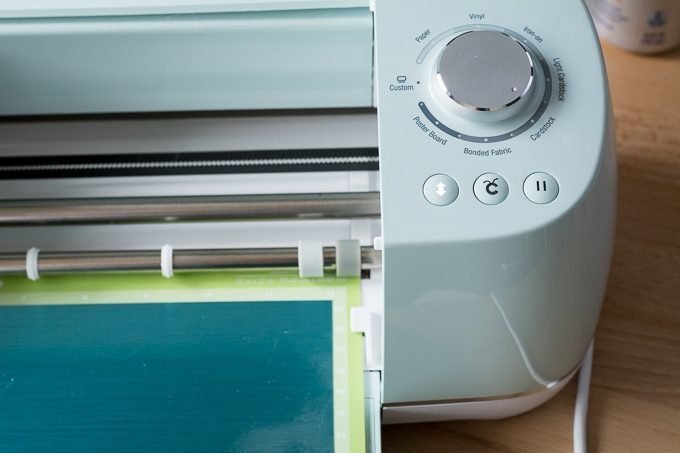
    The prompts in Design Space made it super easy for me to navigate through the process of sending my cuts from the computer to my machine. When my design was good to go in Design Space, there were two steps: load the paper on a Cricut mat and then press the “C” Cricut button on the machine to start cutting.

    And here’s how my test cuts turned out:

     %postname%  %postname%  %postname%

    With the paper backing peeled off and stuck onto a piece of paper…lovely! I am much happier with the results of this test. It was really easy to create these shapes and cut them.

    cricut-first-impressions-14-7207767

    If you want to learn about some different Cricut materials, check out my posts on working with holographic iron-on vinyl, working with Infusible Ink, layering iron-on vinyl, and cutting wood on the Cricut Maker!

    I also want to share some possible items that you can purchase for your Cricut Explore Air 2. I recommend figuring out what projects you’re most interested in, then purchasing items relevant to making those projects (e.g., don’t buy a blade for deep cutting if you’re only going to be working with cardstock and lightweight vinyl).

    The barebones of what you’ll need is below…the tools become really helpful once you’ve moved past the easier test cuts I showed you today.

    • Cricut Explore Air 2
    • Basic tools set
    • EasyPress
    • Cutting mats

    If you aren’t really sure where to start, check out some of these starter packs to see if you can get what you want in a bundle. Bundles are often much more cost effective to purchase. Price everything our individually and then see what they are in a bundle before buying.

    In the meantime, check back in a few weeks for my next Cricut post…I’m going to tackle one of the actual projects in the Design Center!

    cricut-first-impressions-6-3354158

  • Trying Shibori? Learn from my mistakes with this detailed tutorial!

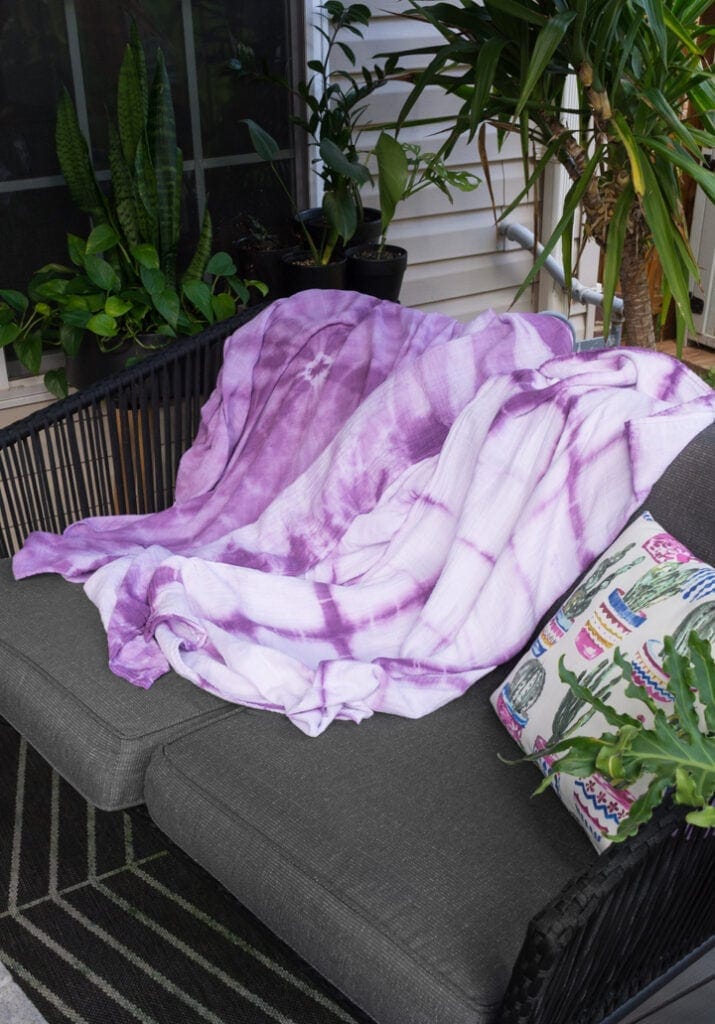
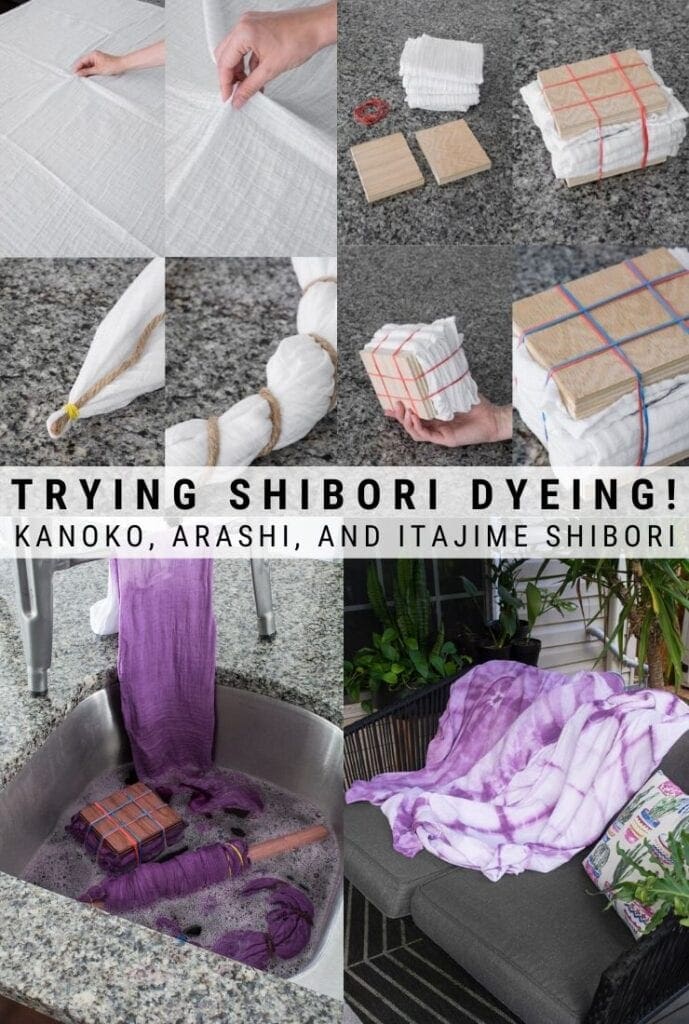
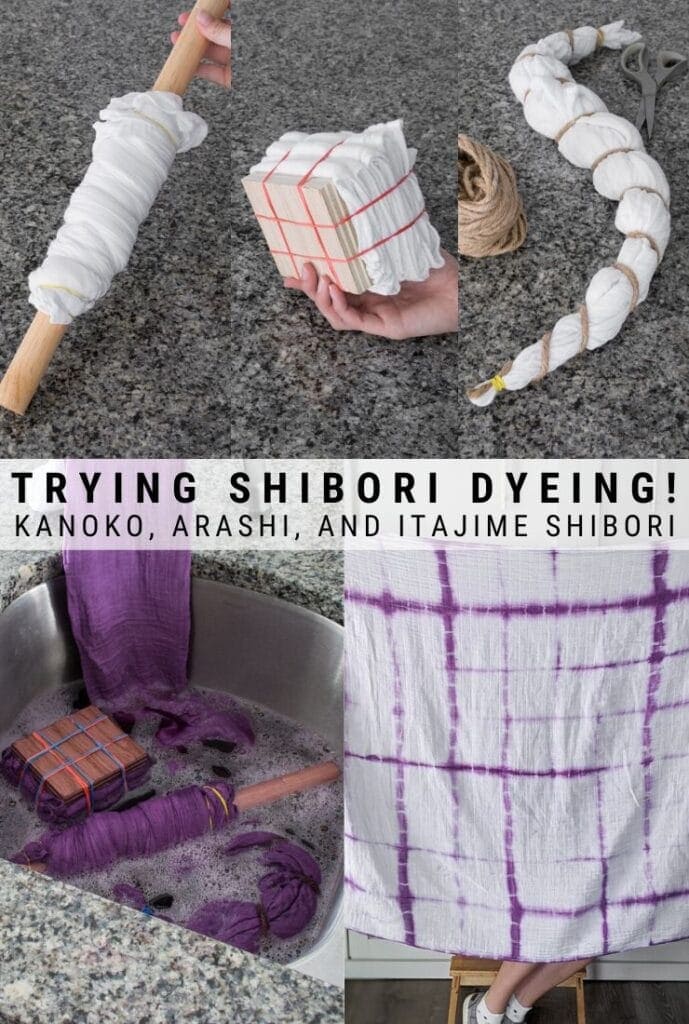
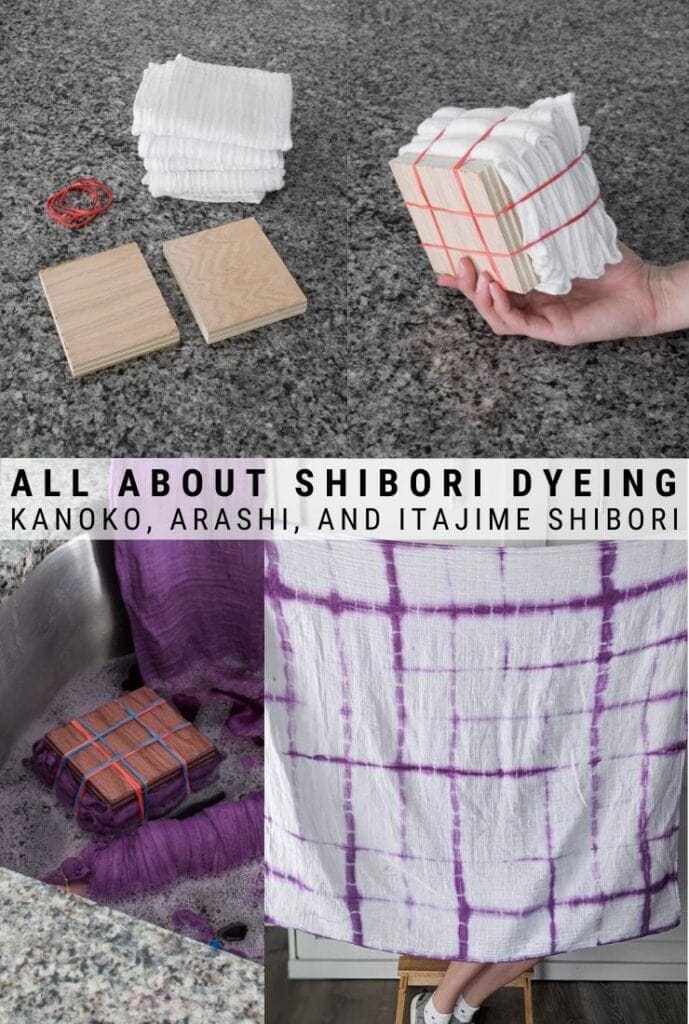
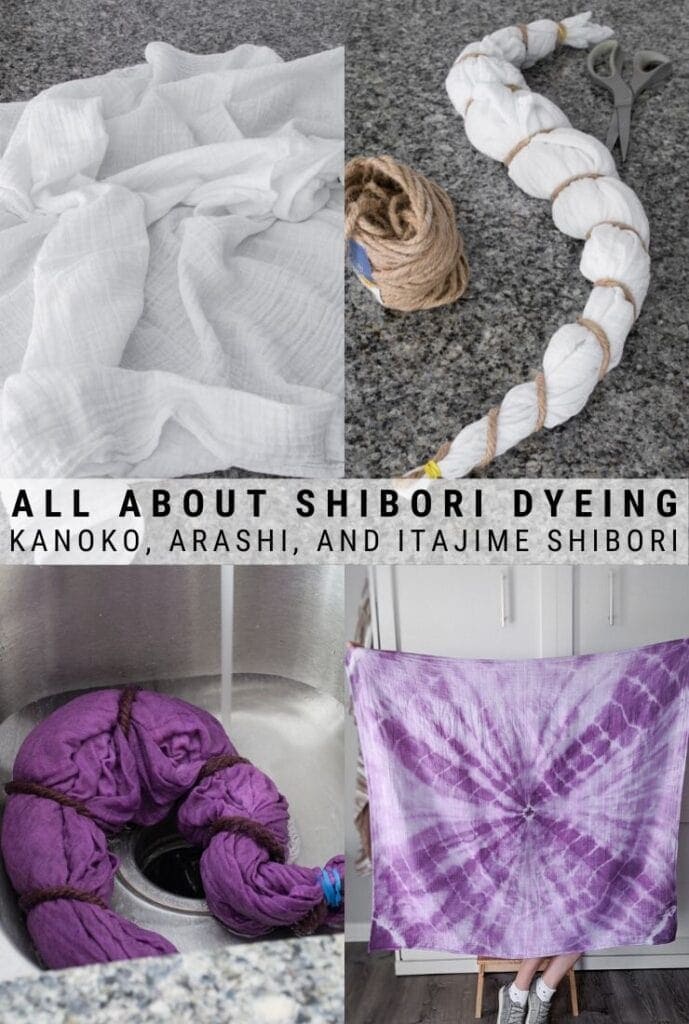
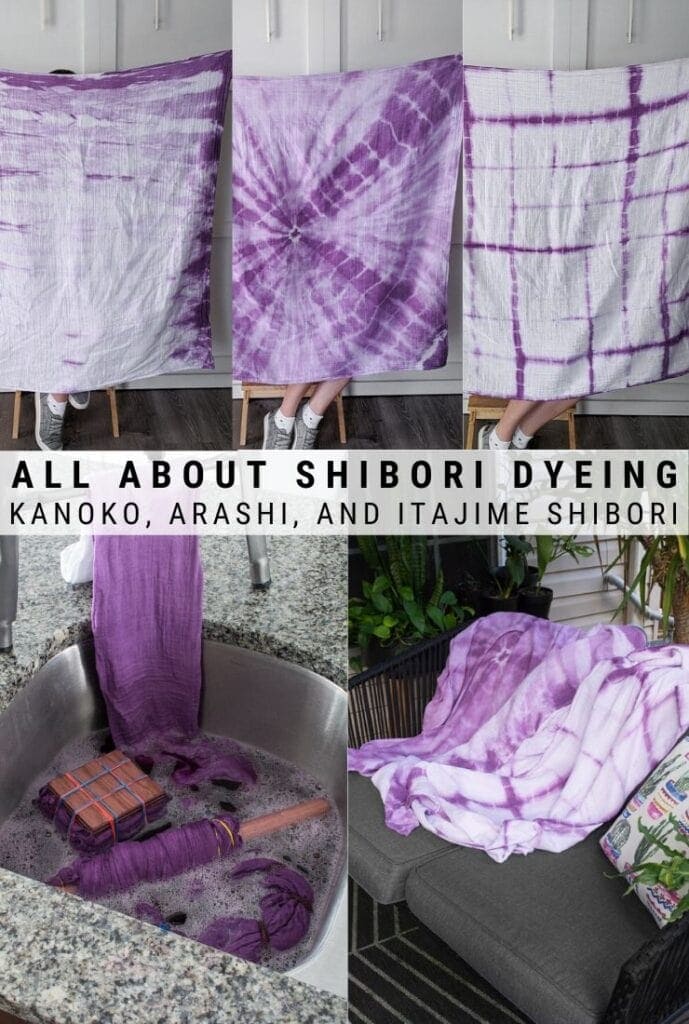
    What is Shibori dyeing? I’m attempting the Kanoko, Arashi, and Itajime Shibori techniques from this beautiful traditional Japanese dyeing art.

    I’ve had the instructions for this tutorial written for months and months. I often do that before I try something new so I can plan out what I’m doing and make sure I understand everything. But time has gotten away from me, and it’s just been sitting there in my Google Drive…waiting.

    But it’s finally time! I am finally trying some Shibori dyeing techniques. I have wanted to try Shibori dyeing techniques for a while because they are so beautiful. I love trying new crafting and DIY techniques…and I’m really pleased with how I did with my first attempt at Shibori!

    So what is shibori? Shibori is a Japanese dyeing technique traditionally done using Indigo. Shibori originated during the early Edo period in Japan (1603 to 1868) when lower-class Japanese could not wear silk. It is a predecessor to tie-dyeing (obviously), but tie-dye did borrow some techniques from Shibori. You’ll notice these similarities in each of the tutorials. 

    Although Shibori is traditionally done using indigo (or dark blue) colors. I’m doing Earth tones on some cotton Muslin blankets to experiment. The indigo hues are gorgeous, but I’m feeling something a bit different for this tutorial. 

    There are six major Shibori techniques: Itajime, Arashi, Kanoko, Miura, Nui, and Kumo. I’m going to experiment with the first three in this post because they are the easiest.

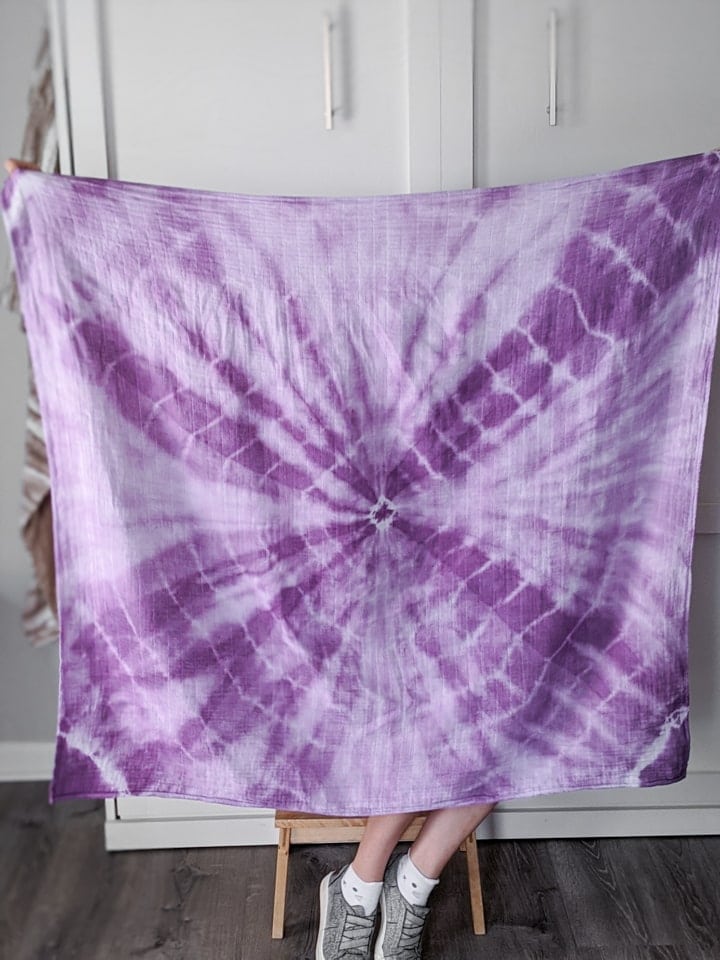
    Kanoko is pretty similar to tie-dye because it is done by winding and twisting fabric and then binding it with string (or rubber bands) to block dye. The contrast between the blocked and dyed areas create beautiful swirl-like patterns.

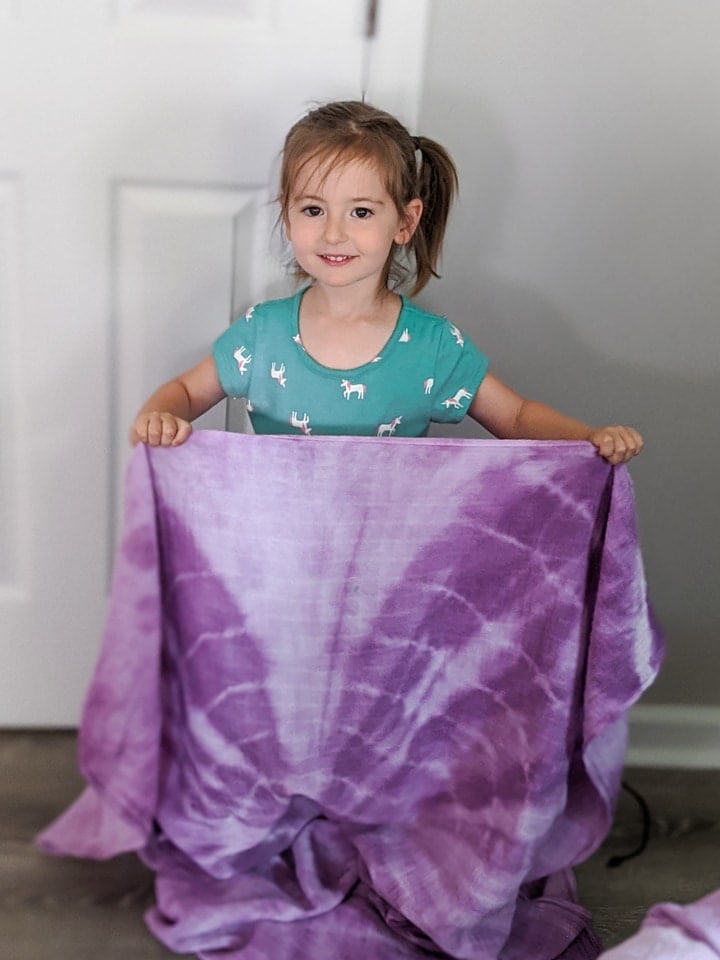
    Arashi is done by twisting and wrapping fabric around a pole and then fixing it in place before dyeing. This approach creates a “storm-like” pattern when done with traditional indigo shades. 

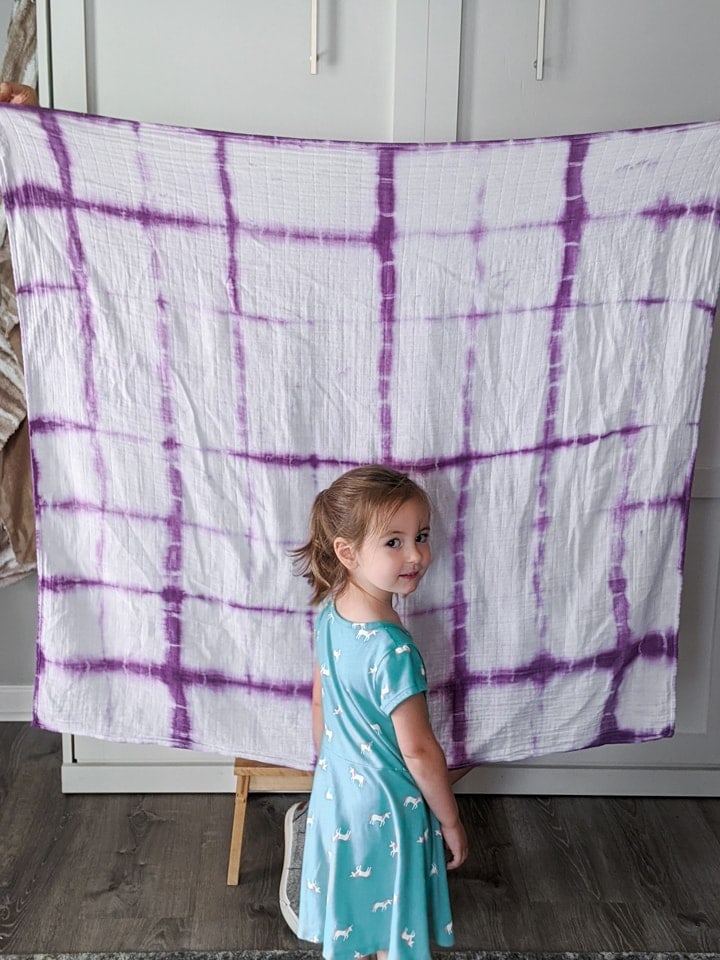
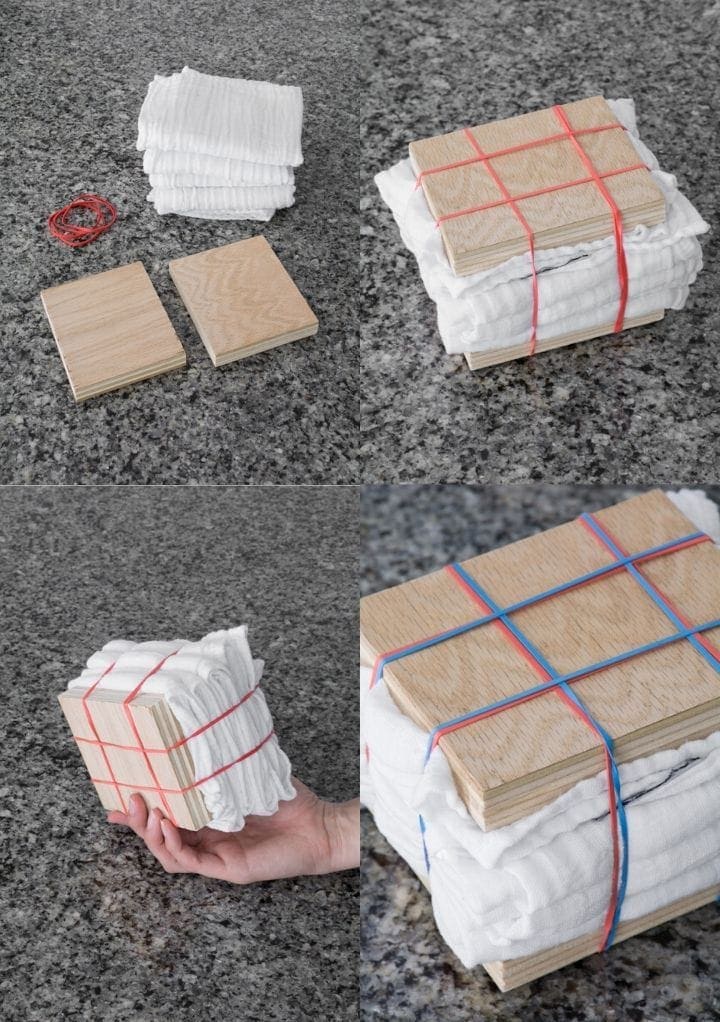
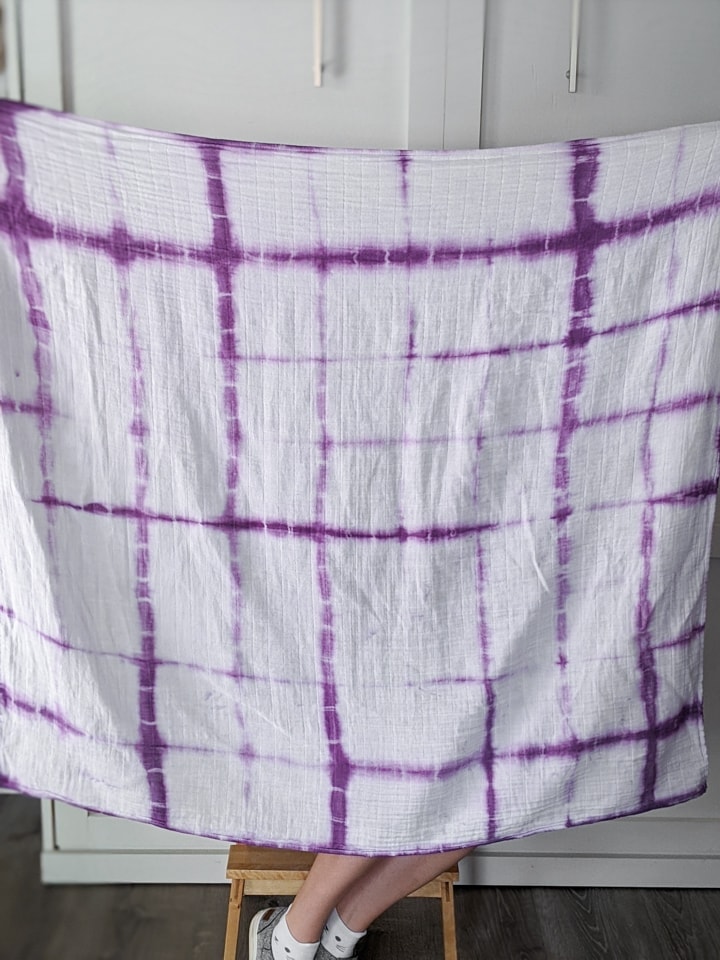
    Itajime is done by sandwiching blockers—usually pieces of wood—on either side of a tightly folded piece of fabric. String or bands hold the blockers in place, and everything together creates an interesting repetitive square-ish pattern. 

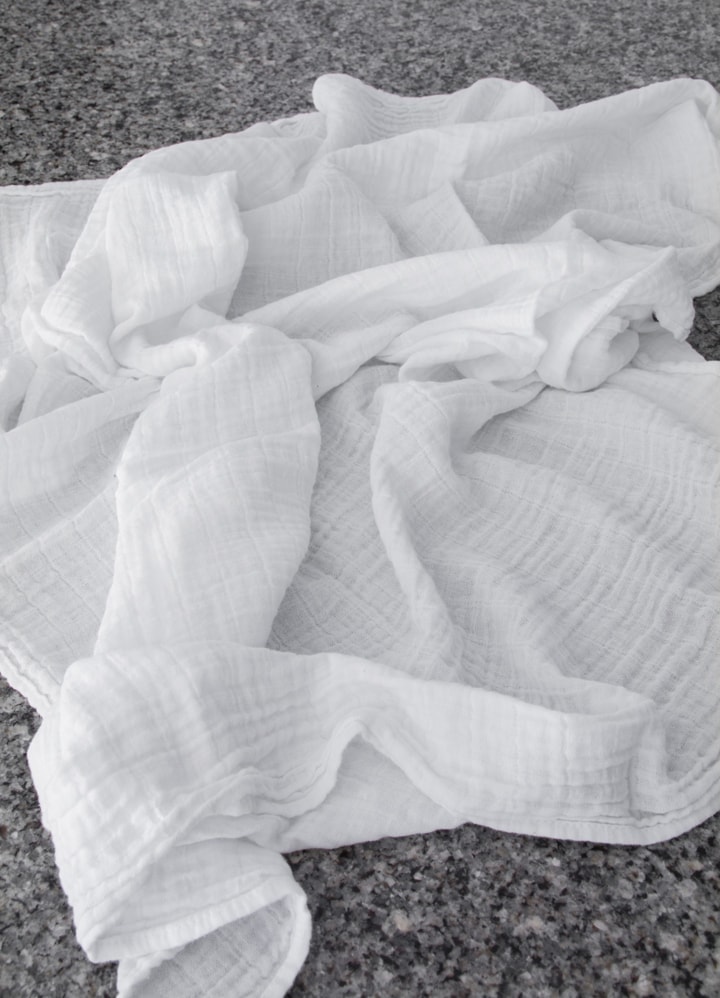
    • Plain white cotton muslin blankets
    • Rit All-Purpose Dye (I used Fuchsia and Purple mixed)
    • Rubber bands
    • Salt (If you’re dyeing nylon, silk, or wool, use vinegar. Salt is for cotton, rayon, ramie, or linen.)
    • Stainless steel sink or plastic container
    • Hot water (ideally 140 degrees Fahrenheit) 
    • Dishwashing liquid
    • Measuring cups and spoons
    • Plastic gloves
    • Workspace protection
    • Paper towels—good to have on hand just in case

    Note: Before getting started, try to remove any stains from your blanket. If your blankets are new, they should not have any stains. Then prewash the item to remove anything the blanket might have been treated with. Treatments could interfere with the dyeing process.

    Note: In addition to the supplies listed above, you’ll need twine to complete the Kanoko Shibori dyeing technique.

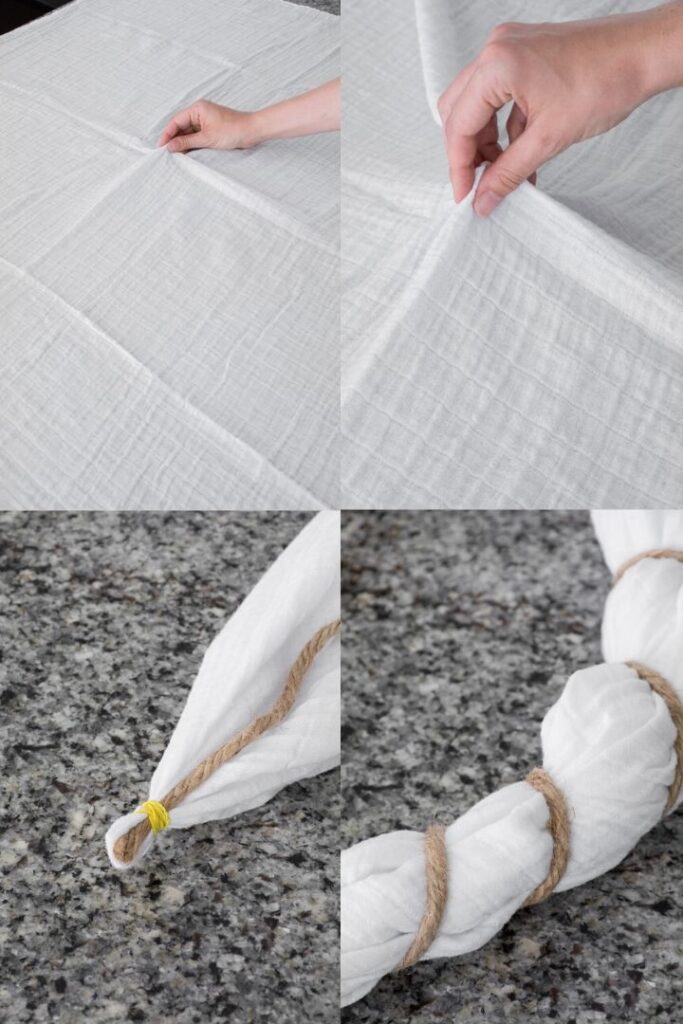
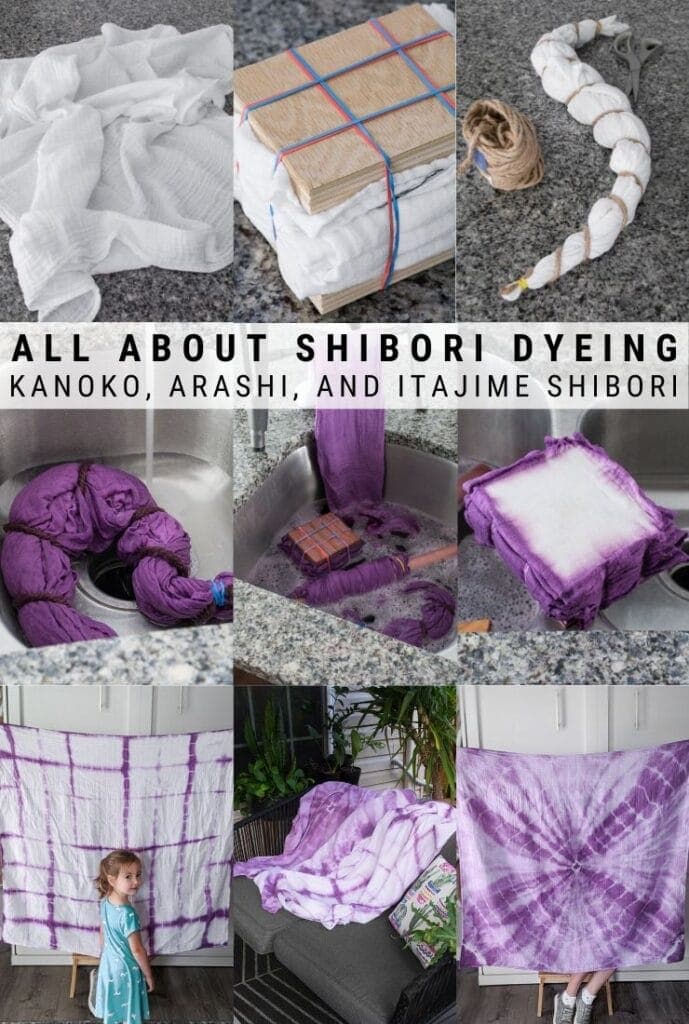
    Wet your muslin blanket. Then spread it out over your work surface. Find the center, pinch the fabric, and pull it up in the air. Secure the pinched area using a rubber band. 

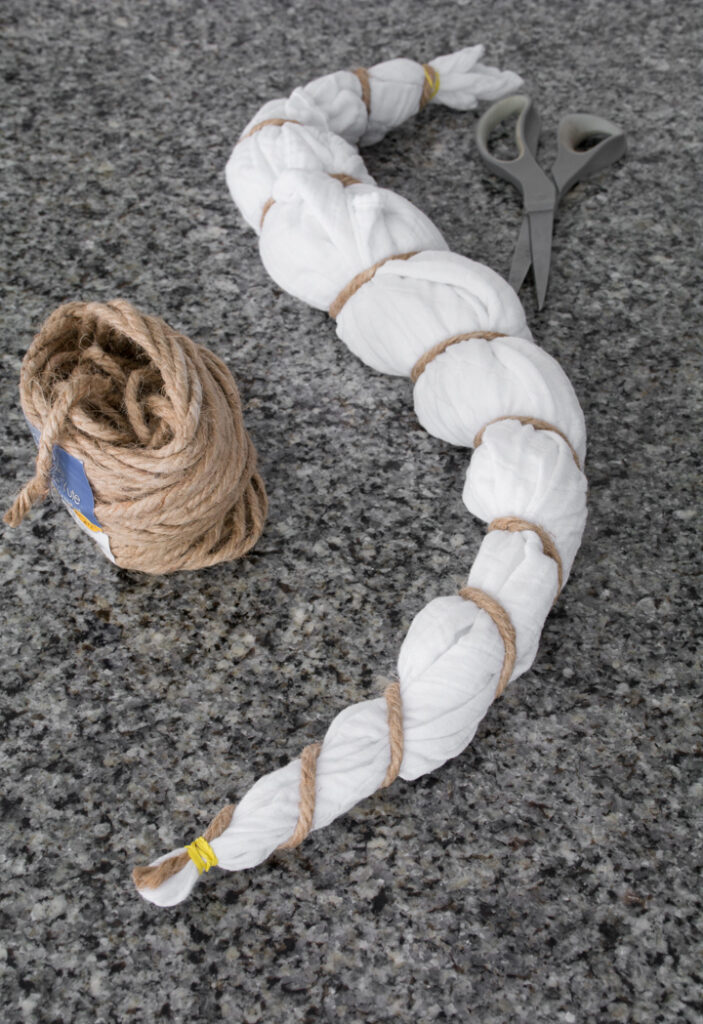
    Cut a long piece of twine and secure one end in place under the rubber band. Wrap the twine around the blanket from top to bottom, binding the blanket tightly as you wind. At the bottom of the blanket, secure the twine in place with another small rubber band.

    I used jute/sisal rope because that’s what I had, but it’s thicker, so that meant I couldn’t get a super tight bind on the blanket. I would recommend using a thiner rope if you want to get a tighter bind, therefore leaving you with a higher contrast and more white space.

    Fill a plastic container or stainless steel sink with an amount of hot water (ideally 140 degrees Fahrenheit) appropriate for the amount of dye you’re using. See your container for instructions. You can also check out Rit’s website. 

    To enhance your color and encourage even dyeing, add one cup of salt and one teaspoon of dish soap. Stir to mix and dissolve everything. Then put on gloves and add the appropriate amount of dye. Stir to mix.

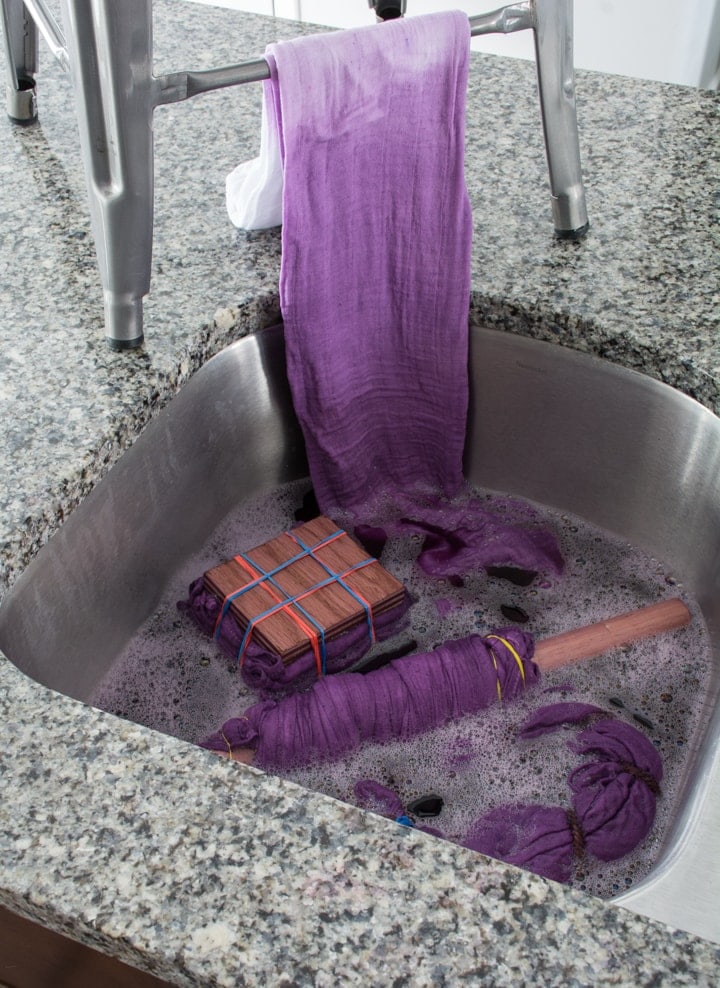
    Now it’s time to dye the first blanket! Add your wrapped blanket to the dye bath. Keep it in for no more than 5 minutes if you’d like to keep the “blocked” parts white. For more blending, leave the blanket in the dye bath for up to 20-30 minutes.

    The longer the blanket sits in the bath, the more the dye will begin to permeate the blocked areas. When you’re done dyeing, remove the blanket but keep the twine on and set the blanket aside.

    K

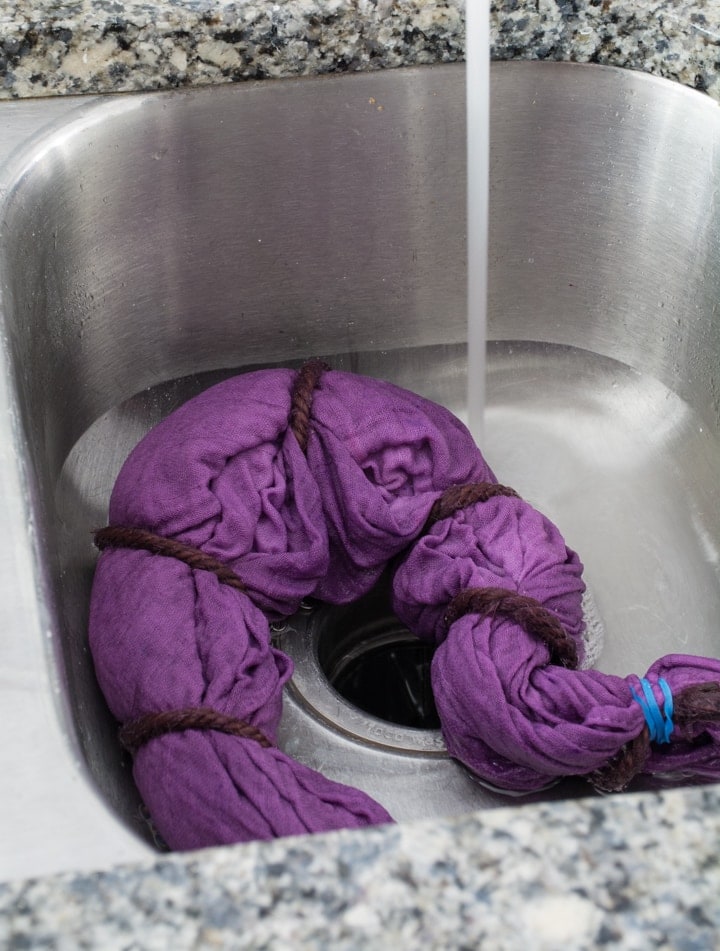
    Rinse the bound blanket in cold water until it runs completely clear. I like using the sink for this. Remove the twine to reveal your dyed Kanoko Shibori pattern! Wash your dyed blanket in water with a mild detergent and dry.

    Note: In addition to the supplies at the beginning of this post, you’ll need some sort of pole. You can use a wooden dowel, a pipe (PVC is cheapest), an old thicker curtain rod…whatever you can get your hands on. 

    Want more dyeing projects? Check out my dyed and personalized kids aprons, my ice dye reusable napkin tutorial, how to dye a rug black, and how to refresh old black clothes using dye.

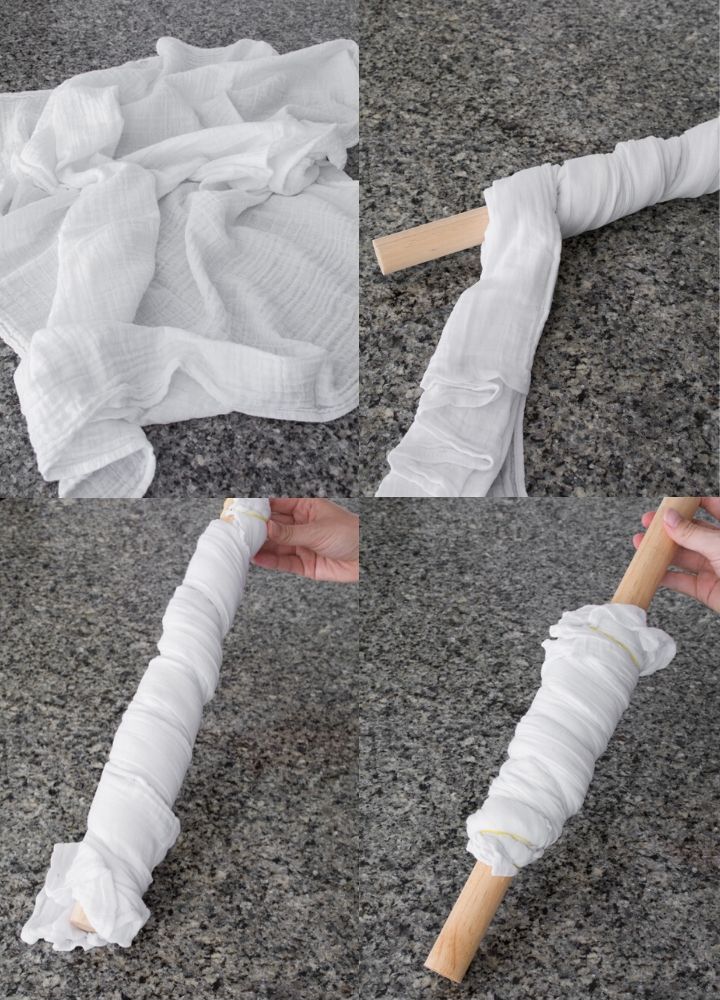
    To achieve the Arashi Shibori technique, begin by wetting your muslin blanket and lay it out on your workspace. Then fold the fabric lengthwise in an accordion style. Each fold should be about 3 to 4 inches. Don’t overthink this—it doesn’t need to be precise. 

    When you’re done folding, use a rubber band to secure the top of your folded blanket to your pole. Then wrap the blanket really tightly around the pole. Do not overlap when wrapping. Secure the bottom of the blanket with a rubber band as well. Then use your hands to push the secured bottom end up, scrunching everything up.

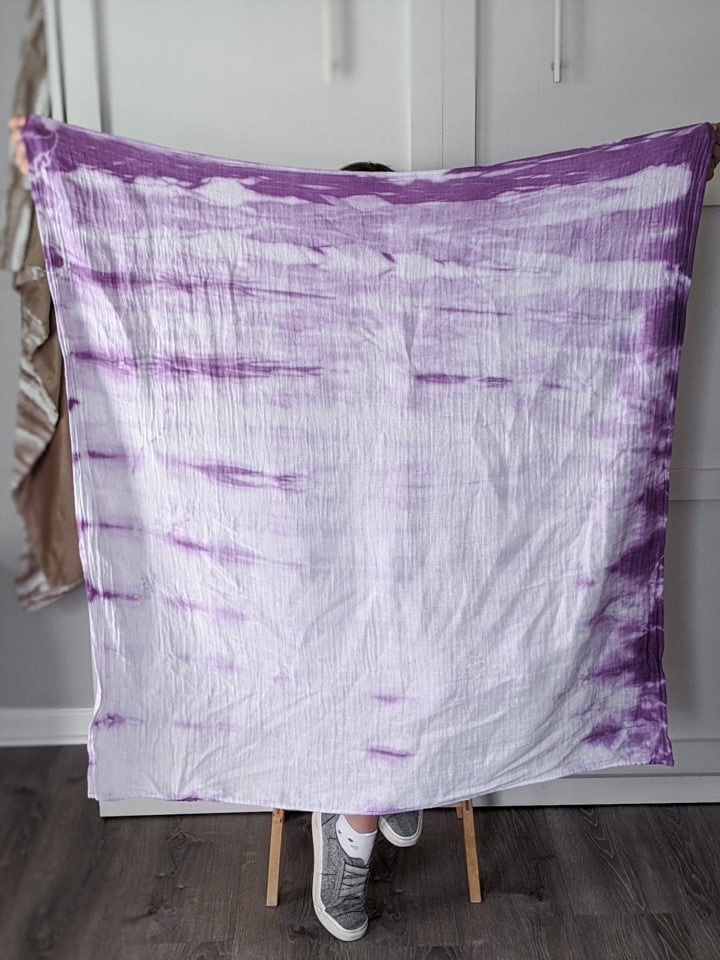
    I scrunched mine up really tight, and it blocked off a lot of the blanket. This left me with a lot of white space when I was done dyeing. So keep that in mind—the tighter the scrunch, the more white space and higher contrast you’ll have.

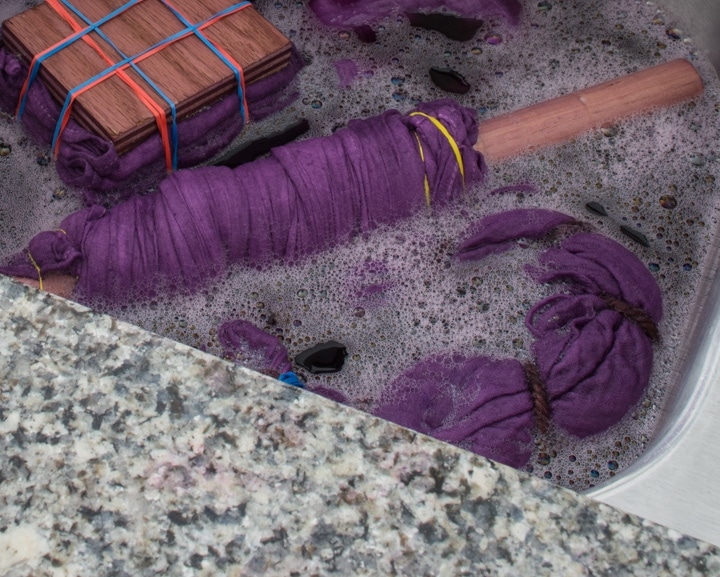
    Fill a plastic container or stainless steel sink with an amount of hot water (ideally 140 degrees Fahrenheit) appropriate for the amount of dye you’re using. To enhance color and encourage even dyeing, add one cup of salt and one teaspoon of dish soap. Then put on gloves and stir in the appropriate amount of dye.

    Blanket dyeing time again! Since you scrunched the blanket up, it should be able to fit in your dye bath. If it is still too big or is a weird angle, you can use a cup to pour dye over the fabric. Same as before—5-10 minutes will be a higher contrast pattern. Up to 30 minutes will increase dye bleed into the blocked white areas.

    Rinse the blanket while still on the pole in cold water. Once the water is running clear, gently remove the blanket from the pole. Wash in mild detergent and dry. Admire your beautiful Arashi Shibori patterned blanket!

    Note: In addition to the supplies list at the beginning of this post, you’ll need two 4-inch pieces of wood to complete the Itajime Shibori technique.

    Wet your muslin blanket and lay it out on your workspace. Creating the Itajime pattern is a bit more involved than the Kanoko and Arashi techniques, but it’s not difficult. First, fold the blanket just as you did in the Arashi tutorial: a fan-style fold lengthwise.

    You can switch up the width of your folds to get more pattern variation, or you can stick to one uniform width for all of the folds. That’s what I’m going with. Then fan fold again width-wise until you have a square of fabric. 

    If you’re into woodworking at all, you probably have scrap wood laying around that you can use. The size of the wood blockers should be the size of your folded square. Use rubber bands to sandwich the folded blanket between the two wood blockers.

    Everything should be reasonably tight. Keep in mind that the tighter the sandwich, the more contrast you’ll have and more white space. Mine was pretty tight, and I’m happy with the result. Just keep that in mind.

    If you aren’t into woodworking and don’t have any scrap wood lying around, here are a few ideas for where to get two wood blockers:

    • Check out the pre-cut unfinished wood area at your local craft store. They might have something roughly the size you need.
    • Visit the trim and moldings section of your local hardware store. They probably have some sort of decorative wood piece that is roughly the size you can use. 
    • If all else fails, you can grab some binder clips and try this contemporary take on Itajime Shibori.

    As in the previous two tutorials, fill a plastic container or stainless steel sink with an amount of hot water (ideally 140 degrees Fahrenheit) appropriate for the amount of dye you’re using.

    To enhance color and encourage even dyeing, add one cup of salt and one teaspoon of dish soap. Then put on gloves and stir in the appropriate amount of dye.

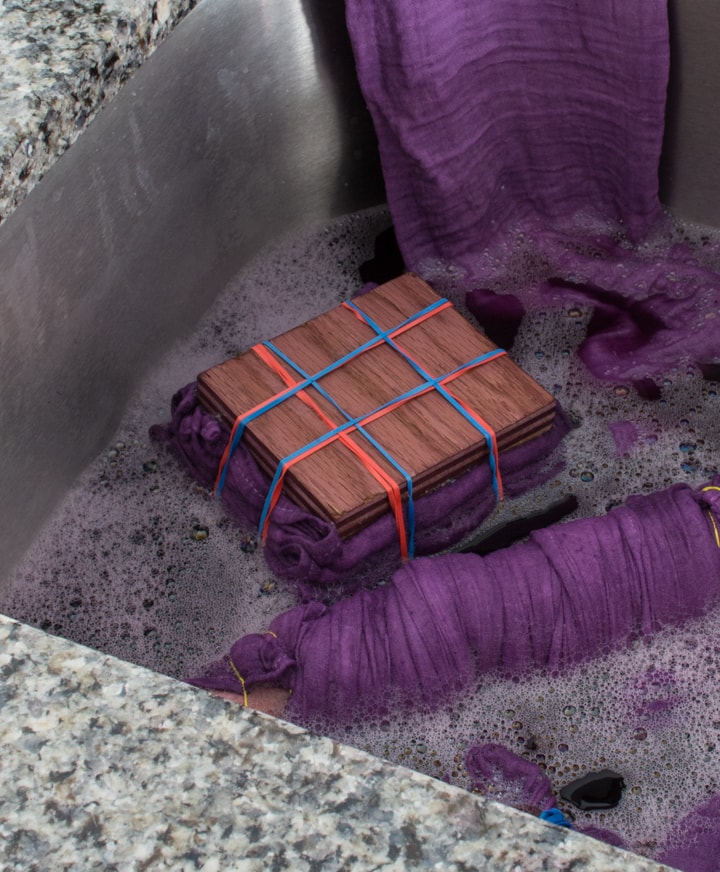
    Time to dye the last blanket. Add your sandwich to the dye bath. Same as before—leaving it in for only 5-10minutes will result in a higher contrast pattern. Leaving it in for up to 30 minutes will increase dye bleed into the blocked white areas.

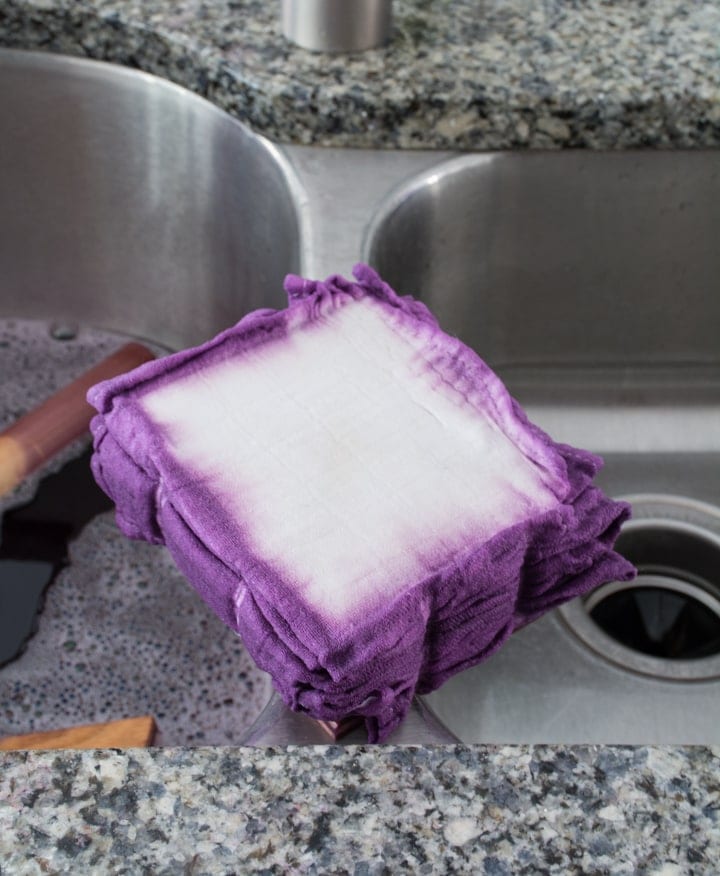
    When you’re done dyeing, take the blanket out, but leave everything sandwiched. Then drain that bath and rinse your sandwich in cool water until it begins to run clear.

    Remove the rubber bands and wood blockers to reveal your beautiful Itajime Shibori pattern. Same as the others—you can then wash and dry the blanket as normal for use.

    This was a very fun experiment to do. I really like these techniques because they are so forgiving. Have you ever dyed using a Shibori technique before? What are your tips?

    Pin my DIYs using Kanoko, Arashi, & Itajime Shibori Techniques!

  • Totally free October 2021 computer and mobile tech backgrounds!

    This content may contain affiliate links. See my full disclosure here.

    Looking for free October 2021 computer and mobile backgrounds with calendars? Here are a few to choose from with a plant theme. Free instant download!

    I know I said I wasn’t going to miss a month for the backgrounds…I mean, I made them all! They were ready to go! And guess what I did? I missed September. I’m really sorry about that.

    I missed it because I started a new job. Between being busy wrapping things up at my old job, taking a few days off to recharge before my new job, and the overwhelm of starting a new job—yes, I dropped the ball. Forgive me 🙂

    Which shouldn’t be hard, because…I am back with October backgrounds! They are still plant-themed, as all of the 2021 computer and mobile backgrounds I made are. I might get around to making some seasonal- or holiday-themed ones, but I just haven’t had the time.

    And I have mobile backgrounds, too!

    And like in past months, I also have phone backgrounds too. Some have the little calendars on them, while others are just plain backgrounds with the plants. Whatever floats your boat!

    I am also going to try to bang out the November backgrounds post too, and I’m putting it on my calendar to maybe whip up some holiday-themed backgrounds for December. But we’ll see what I can manage! Bear with me while I adjust 🙂

    Like these? Check out my free printable plant-themed daily planner pages and my plant-themed printable to do lists!

    Download all of the options here!

    Download the options below by submitting your email. Once you confirm it’s really you, you’ll be directed to my Dropbox folder with all of the files. Enjoy and come back next month!

    Pin my free plant-themed October 2021 computer and mobile backgrounds!

  • Make Crafts Not War Pillow Tutorial – Let's Craft Instead

    This content may contain affiliate links. See my full disclosure here.

    Learn how to make a cute statement pillow using plain fabric and felt!

    Make crafts not war pillow tutorial

    Last week, I shared a “Make Crafts Not War” printable and said that I would be using it for a project…well, I’m done and ready to share. Today I’m going to show you how I made my “Make Crafts Not War” pillow using fabric, .59-cent felt, and some top stitching.

    I was inspired to make this for a few reasons. First, I was browsing Etsy one night and saw this pillow. I loved the way the felt looked on the fabric, I just didn’t know what I wanted my pillow to say. Cue the printable…the perfect fun saying for my pillow. I’ve even included a template that you can use. So, if you’d like to make a similar pillow, read on.

    Supplies

    • Fabric and felt (the small kind of felt that you can buy in the craft section).
    • Embroidery thread & needle.
    • Embroidery hoop.
    • Template for letters (download it here).
    • Batting (I used the same kind I used for my no-sew pillows).
    • Fusible web (make sure it isn’t a super strong hold–you’ll need to be able to sew through it).
    • Iron and ironing board/pad.
    • Scissors and pencil.

    And here is my make crafts not war pillow tutorial!

    Step 1: Cut your pillow fabric

    The size is entirely up to you, but you’ll want two pieces that are the exact same size. Keep in mind seam allowance. Once cut, set aside.

    Like easy sewing projects? Have a look at my easy fabric scrap cat toys, my DIY sewing machine cover, my super simple circle skirt, and my DIY wrap shawl!

    Step 2: Make your felt letters

    To do this, I set my fusible web paper-side up on top of my letter pattern and traced the outline of each letter. Then, I ironed my fusible web onto the wrong side (if there is one) of my felt—make sure you follow your brand’s directions.

    Step 3: Cut letters out

    After everything cools, carefully cut your letters out. Make sure you’re not pulling the felt off of the fusible web. If the fusible web’s paper backing starts to peel off, that’s okay.

    Step 4: Attach letters to pillow

    Set one piece of your pillow fabric right-side up on your ironing board. Peel the paper backing off of the letters and arrange them felt-side up on the pillow fabric. Follow your fusible web’s instructions to iron the letters onto the pillow fabric.

    …This is where things got ugly for me, so there are no pictures. My letters just would not fuse to the fabric! I think that I may have ironed for too long in step #2. 🙁 But I had put a lot of work into the letters, so I wanted to salvage them.

    I took the only kind of glue I had in the apartment—wood glue—and put tiny dabs on the back of each letter. Then, I carefully arranged the letters and let them dry for a few hours. Hopefully you can skip this step, but it did work!

    Step 5: Stitch letters on

    Once your letters have cooled (or dried…), put the fabric into your embroidery hoop and sew a straight stitch along the border of each letter.

    Now all you have to do is sew up the sides just like you would any other pillow. With the right sides of each fabric piece facing one another, sew a straight seam along each side. But, make sure to leave a ~6in opening on the bottom.

    This is where you’ll reach in to stuff the pillow. I made a French seam on mine because I think it looks very neat. (For more on making a French seam, see the instructions in this post.) Stuff the pillow and sew up the opening by hand. You’re done!

    Pin my make crafts not war pillow tutorial!

  • Customized Craft Caddy: Add a Peeking Monster on a $3 Target Caddy

    This content may contain affiliate links. See my full disclosure here.

    Learn how I used my Cricut to make a customized craft caddy! I added a peeking monster face to the $3 craft caddy to make it fun for a toddler—an easy vinyl crafting project.

    Customized craft caddy: $3 Target bullseye section project!

    I took a couple days of vacation a few weeks ago. And although I didn’t go anywhere because we can’t really go anywhere, I took some time to catch up on errands, do some shopping for myself, and do some projects. When I was at Target to pick up some more pull ups, I saw the cutest little colorful school storage solutions.

    R has been so in to coloring and other simple crafts lately. And since things have been so boring for her at home most of the time, I decided to pick up a cute little $3 green caddy to put her craft supplies in. She is 2, so she loves anything with a handle that she can carry around. And of course I decided to do a quick Cricut customization on it. Here’s how I did it!

     %postname%

    If you’re new to Cricut, check out my “Which Cricut Should I Buy?” post that provides a detailed overview of the Cricut Joy, Cricut Explore Air 2, and Cricut Maker machines!

    Here’s what I used:

    And here’s how I made my customized craft caddy!

    Step 1: Open project in Design Space

    I looked at a few different cute monster files already in Design Space and settled on this one, #MB34AD56 in Design Space. I then added a rectangle and used the Design Space “slice” effect to create a little peeking monster. See the sliced version here if you don’t want to slice your own. You can also check out my post on how to slice text and objects in Design Space for a full tutorial on this!

    Step 2: Cut and weed monster design

    Since this was a smaller project, I used my Cricut Joy and a small mat to cut this. I needed to use a mat because I was using regular vinyl I’ve had for a while. You can only ditch the mat on the Cricut Joy when using Smart Materials.

    For more Cricut kid content, check out my DIY matching/memory game project, my customized kids play apron, and my post on how to personalize a cheap LCD tablet!

    Step 3: Transfer design to craft caddy

    Time to customize this craft caddy! One of the monster eyes popped off while I was weeding the negative space from the cut design, so I just added it to the transfer tape myself. Then I used the transfer tap to transfer the design to my craft caddy.

    It looks so cute! And this whole project took me about 30 minutes, including searching for the perfect monster file to use. I really love the Cricut Joy because it’s so easy to pull out of a drawer, set up, and cut small pieces on.

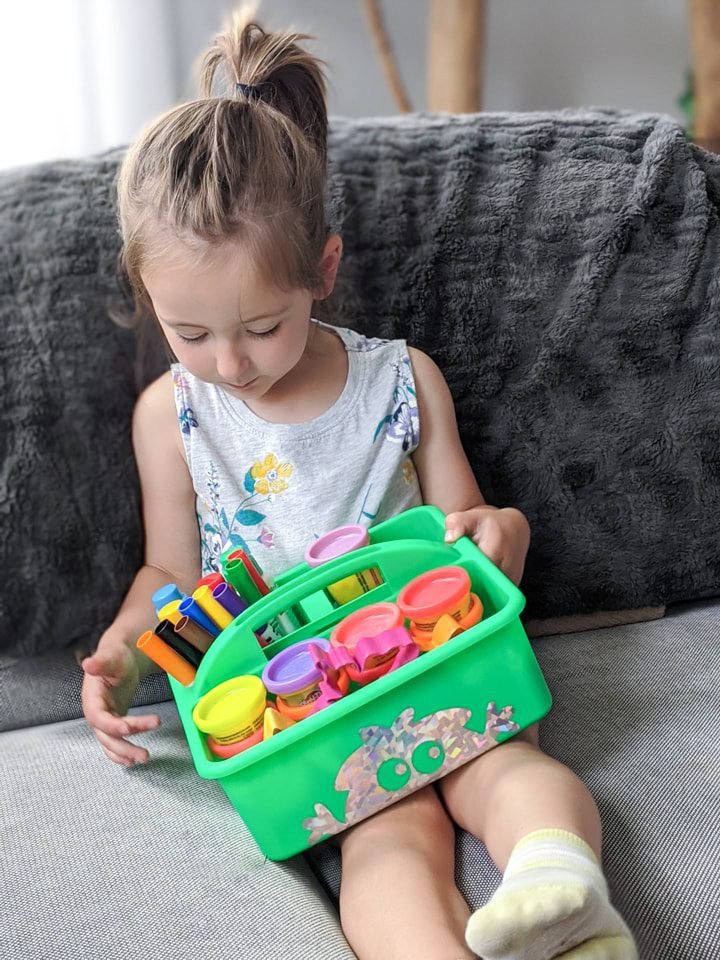
    And here’s the finished customized craft caddy!

    My little monster loved it! She said it was a “fuzzly” because it kind of looks like the cute little monster fuzzly things from Abby Hatcher Fuzzly Catcher, her current favorite show. 🙂 And that’s that! A $3 caddy, some scrap vinyl, and my Cricut machine is all it took.

  • DIY Twin Coming Home Outfits: DIY Baby Shower Gifts for Twins

    This post shares two free cut files to help you make the cutest DIY twin coming home outfits! Or you can make these as DIY baby shower gifts for twins.
    DIY Twin Coming Home Outfits—Perfect Baby Shower Gifts!
    Hey guys! Today I’m sharing some ideas for cute DIY twin coming home outfits or baby shower gifts. If you like DIYing gifts, baby bodysuits are very practical gifts. If you have a summer baby, they can rock them alone. And if you have a winter baby, they are good for layering and keeping baby’s core warm. You can’t lose!

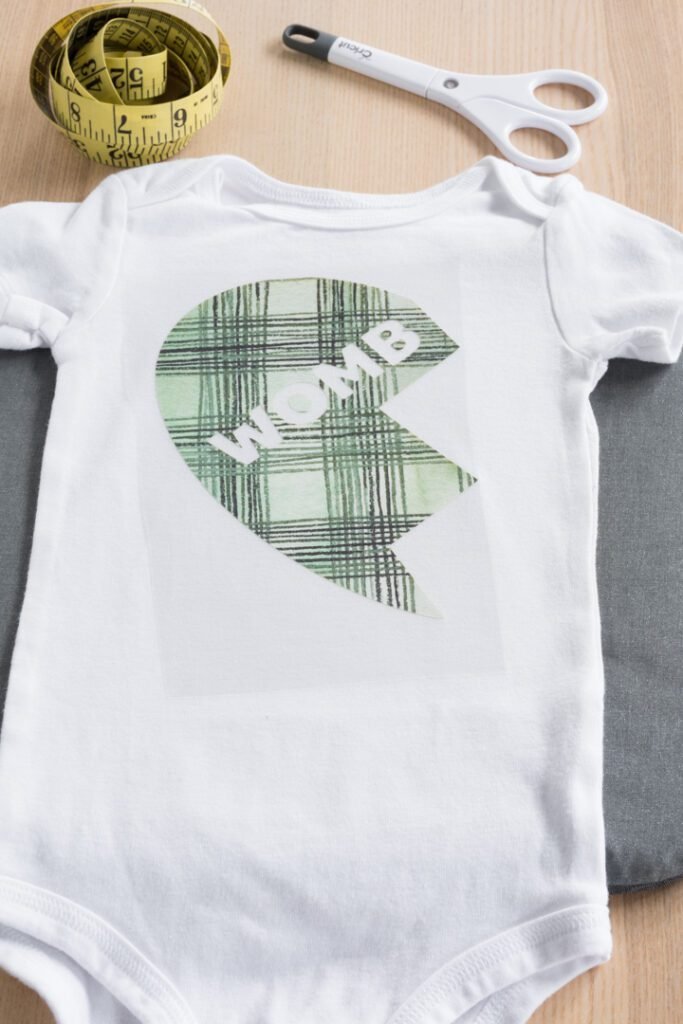
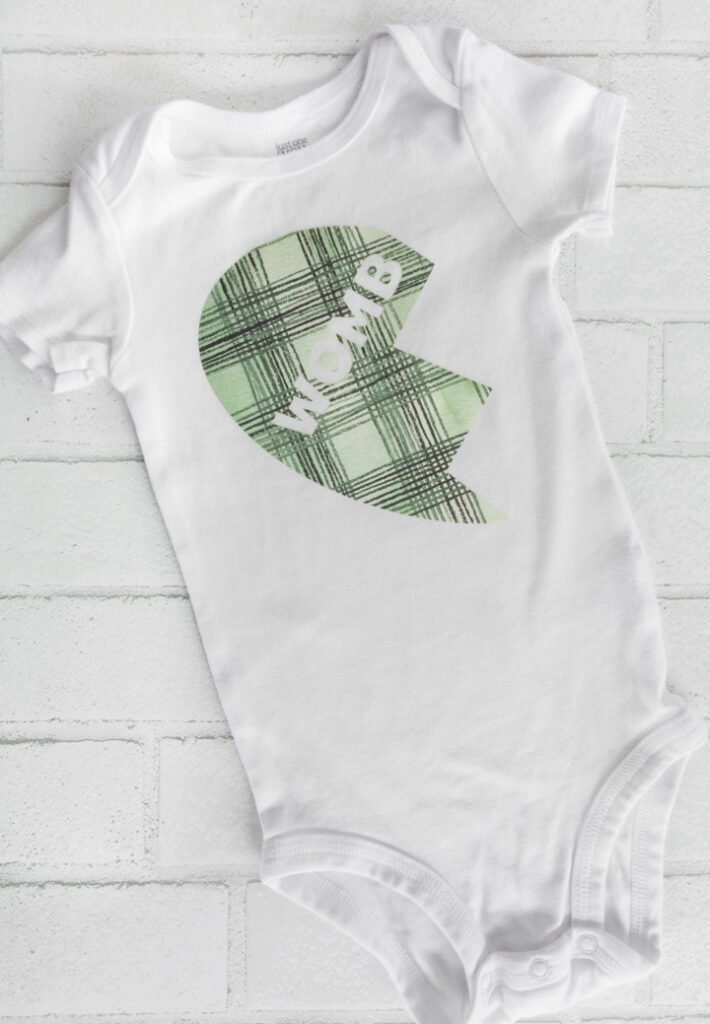
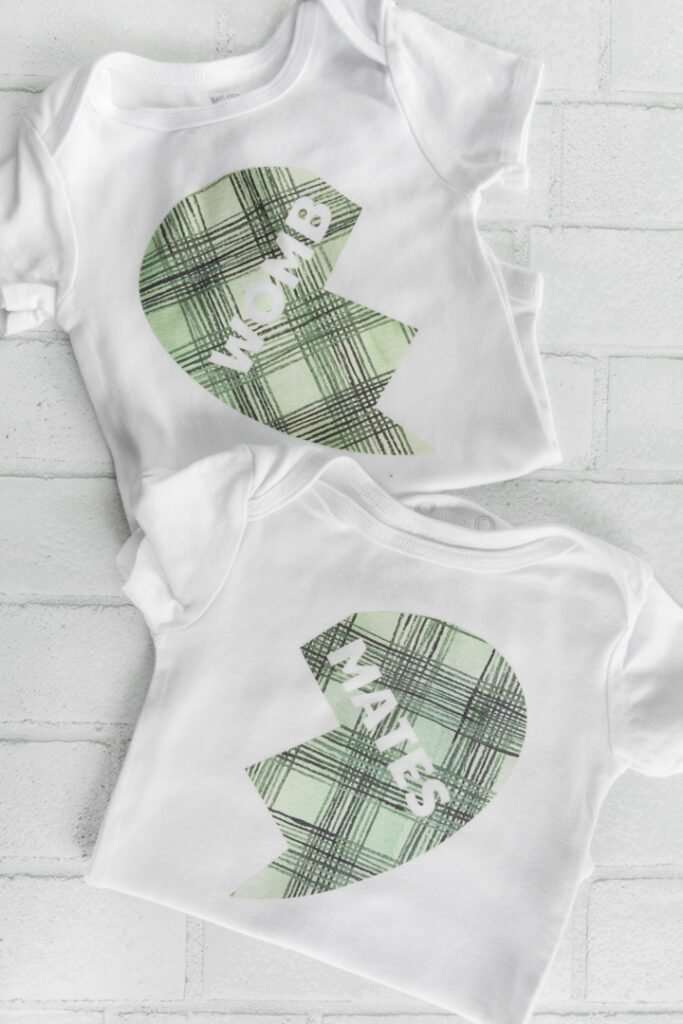
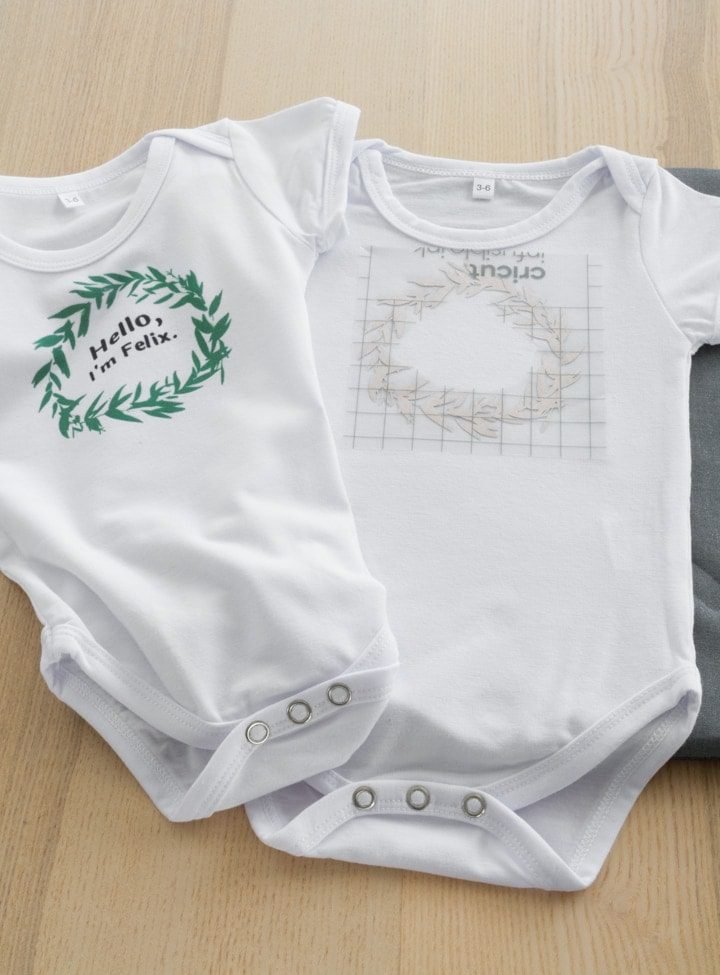
    Today I am sharing two ideas for my friend Allison’s twin boys: The first is a “womb mates” pair of bodysuits that that I’m giving you guys access to the cut files for. I’m also using Cricut’s patterned iron-on for this design, so I’ll talk a bit about that two. The second is a project idea using Cricut’s Infusible Ink. So let’s jump in!

     %postname%

    HERE’S WHAT I USED FOR THIS PROJECT:

    And here’s how to make DIY baby shower gifts for twins!

    Step 1: Prep the twin heart design in Design Space

    First grab the cut files in Cricut’s Design Space. Note that you must be logged in to access this project. Add them on your Design Space canvas and size your pieces based on the size of your bodysuits.

     %postname%

    Step 2: Cut and place the design

    I used this green flannelish patterned iron-on because these are Canadian babies, and in my head, Canadians wear exclusively flannel. Don’t ruin this for me! Before you cut the design, make sure you mirror it, too. 🙂

    And here are a few things about patterned iron-on, which I talked about at length in this post about using it with wood. First, when working with patterned iron-on, you should have the blue LightGrip mat, not the StandardGrip green mat you typically use with vinyl. I’m not sure why that is—maybe the patterned iron-on is more delicate?

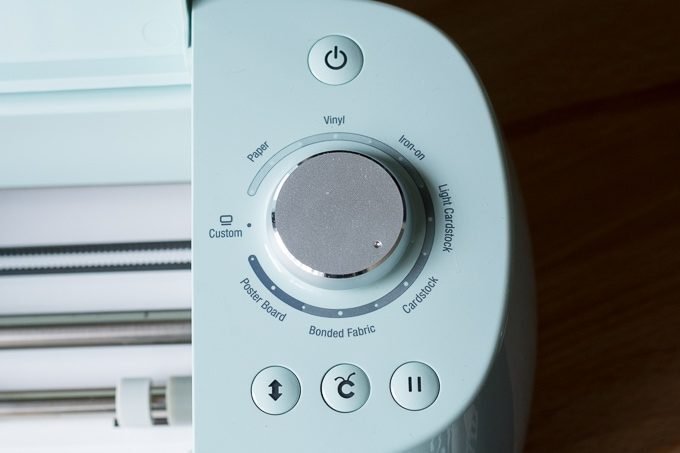
    Second, The “sticky” side looks a bit different, too. It’s a bit bumpier looking to me. And third, the patterned iron on requires a slightly different cutting approach to get the perfect kiss cut, which leaves the liner in tact. You can use patterned iron-on with all Cricut machines, but don’t just select “iron-on” from your Cricut’s dial. For Explore machines, turns your dial to Custom first. On Makers, just select it as you would any other material.

     %postname%

    Step 3: Transfer the design

    Use Cricut’s Heat Guide to figure out what settings you need to use for your EasyPress. This depends on the EasyPress you’re working with (original or EasyPress 2), the material you’re working with (100% cotton or otherwise), and the type of material, which in this case is of course patterned iron-on.

    A heads up about working with patterned iron-on. I do think it has a smell that’s a bit different from regular iron-on. Also, make sure you don’t apply the heat for longer than the recommended time. It can start to give the patterned iron-on a “pixelated” look because it starts to overheat.

    It’s a cold peel, meaning you let the design cool completely because you remove the liner. It’s a bit harder to pull the liner off than if it were a warm peel or regular iron-on. Just be careful, and if pieces of the design come up, just apply a bit more heat from the back of the bodysuit so you don’t hurt the pattern.

     %postname%  %postname%

    And here are the finished twin outfits!

     %postname%  %postname%  %postname%

    DIY Baby Shower Gifts for Twins Using Infusible Ink

    And here’s the second one! I unfortunately don’t have the rights to share the vine circle file with you guys, but you can find a similar one online and use it for your own personal project by searching for “free leaf border image” or “free leaf border .svg.” For the font, I just used a free system font in Canva.

    HERE’S WHAT I USED FOR THIS PROJECT:

    For more Infusible Ink projects, check out my personalized Infusible Ink baby bodysuits, my custom Infusible Ink plant-themed coasters, my review of the new Infusible Ink blanks, and my detailed tutorial for using the Cricut Mug Press!

    And here’s how I made the cutest DIY twin coming home outfits!

    Step 1: Cut the patterns

    After I sized and cut the patterns in Design Space (make sure to mirror!), I weeded the negative space out of the designs. This was the hardest part of this project but one that I was looking forward to testing out! I wanted to see exactly how intricate I could make an Infusible Ink design. Would it be easy or a huge pain to weed a really intricate design?

    I was actually really shocked at how easy it was to weed this intricate of a design. I did have to use the tweezers to pull out some of the smaller sections, but over all I am really pleased with the process. And with how beautifully it transferred.

     %postname%  %postname%

    Step 2: Prep the bodysuit blanks

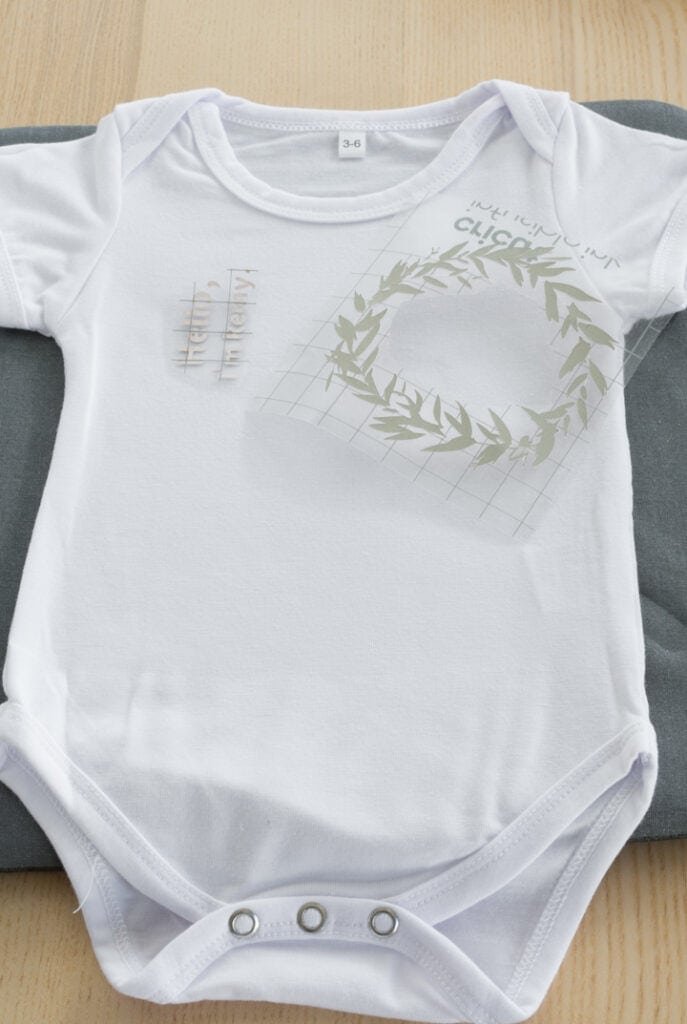
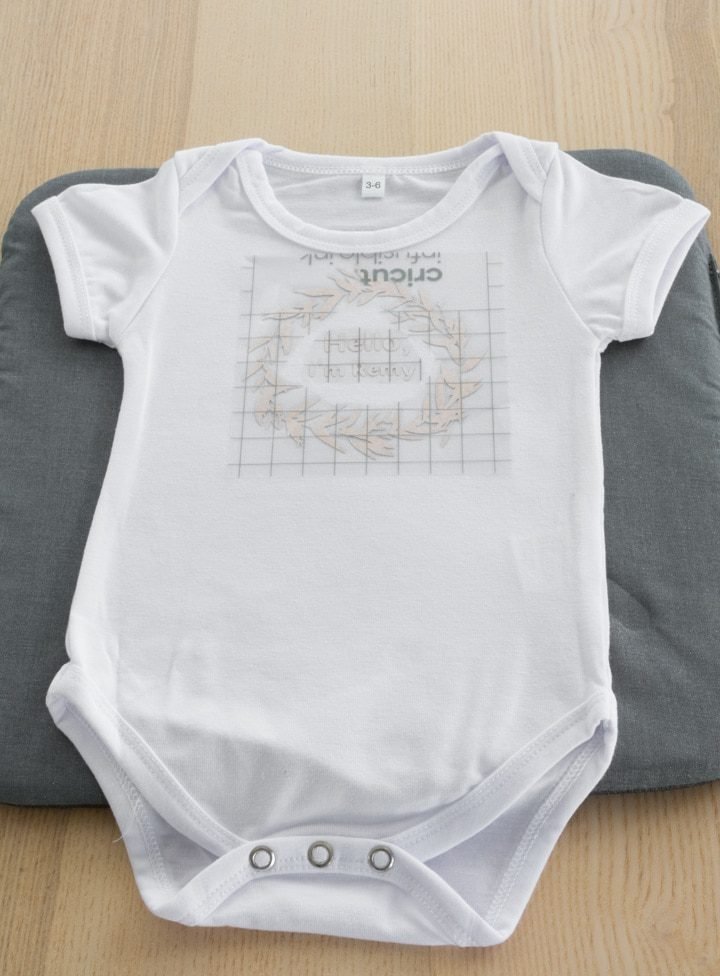
    I followed the instructions for preparing the bodysuit blanks, which basically just means lint rolling the bodysuits, preheating them to remove wrinkles and any excess moisture, and then letting them cool completely. You can see below that I did the first bodysuit and then set it next to the blank one to try to mirror the placement as much as I could.

    Remember now to apply the weeded Infusible Ink design to the bodysuit until it cools completely. You may smudge off some of the color/design and ruin your blank!

     %postname%

    Step 3: Transfer the Infusible Ink designs

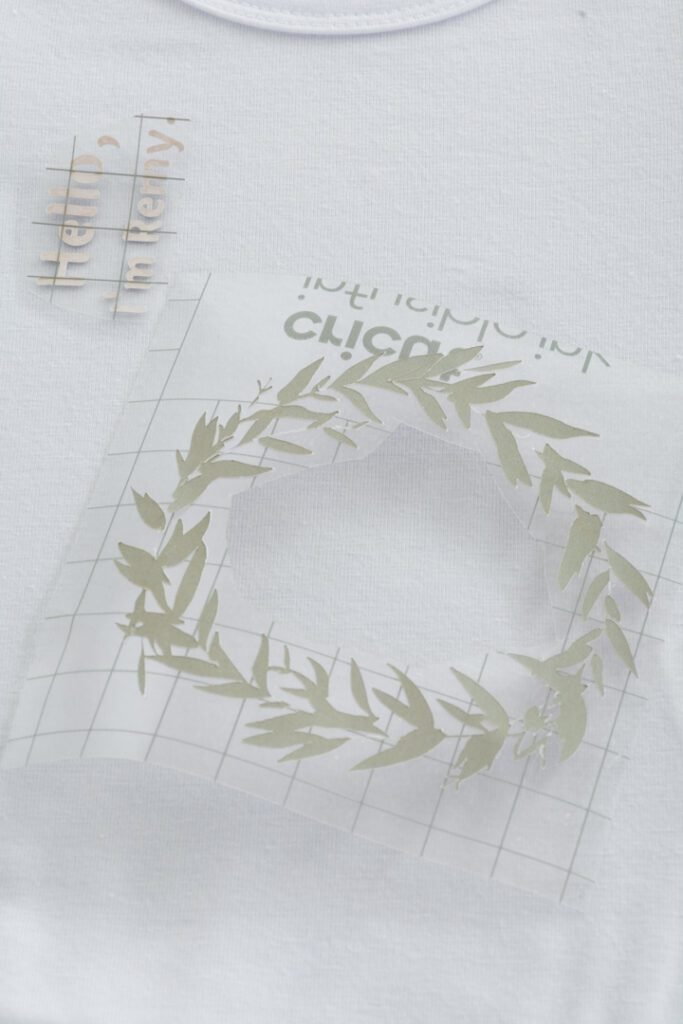
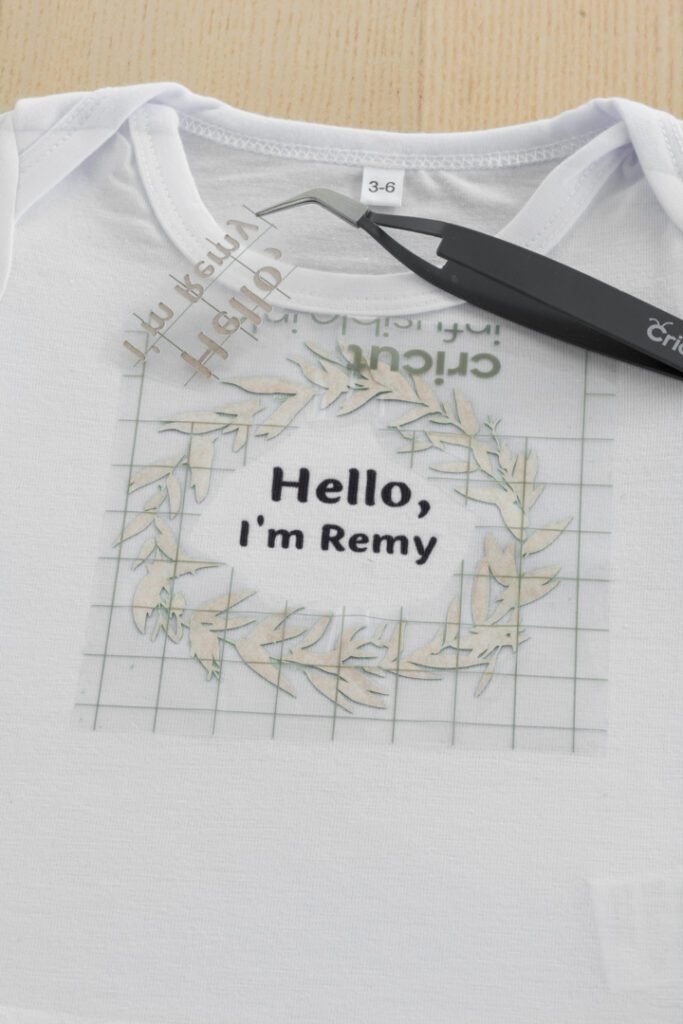
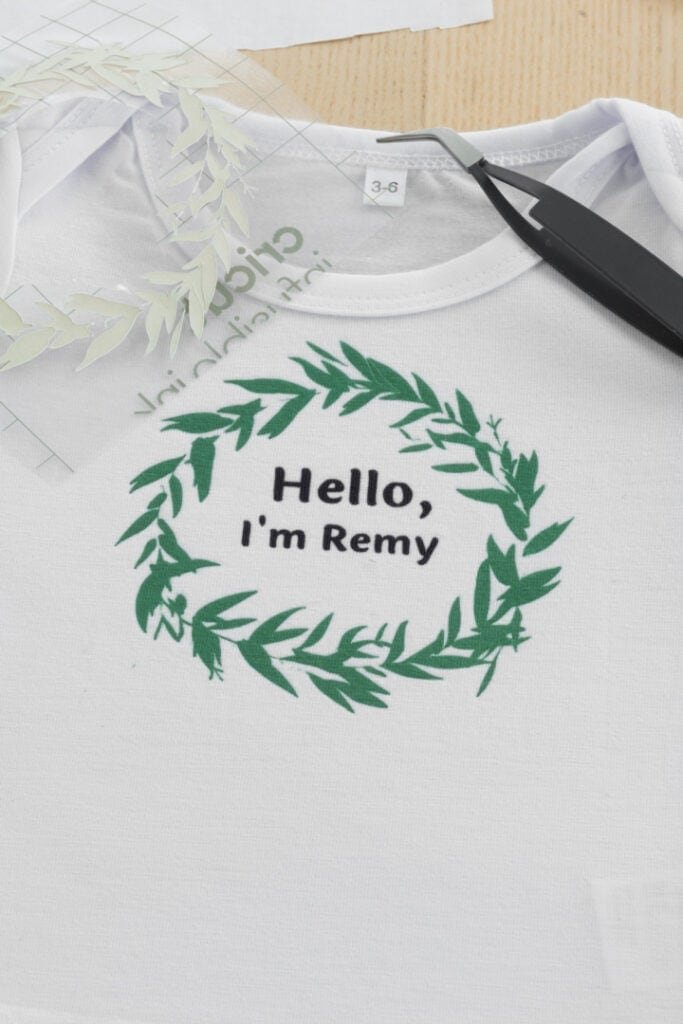
    Next I followed the guidelines in Cricut’s heat guide to transfer the designs. I cut the liner area out of the middle of the plant wreath thingy so that I could put the “Hello, I’m Remy” text in the middle. I didn’t want multiple layers of the liner.

     %postname%  %postname%

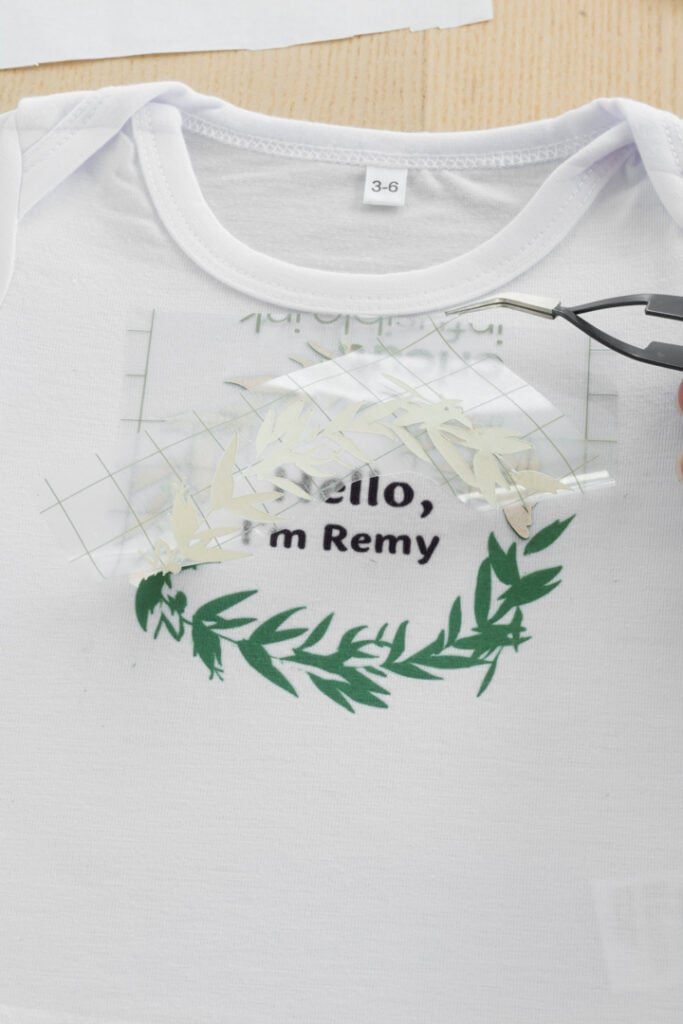
    For this transfer, I used an EasyPress 2 at 385 degrees. You can see the transferred design around the edges below. I used tweezers to gently remove the two parts of the design, pulling up the text part first and then the leaf wreath.

    I was really pleased with how this transferred! Not only did the Infusible Ink weed really well, even on such an intricate design, but it transferred beautifully as well. One warning, though—since there are so many small pieces you’ll pull off when weeding a design like this, make sure you get all of them off the liner! If any tiny bits stay on, they will transfer to your blank and you’ll end up with some colored specks.

     %postname%  %postname%  %postname%  %postname%

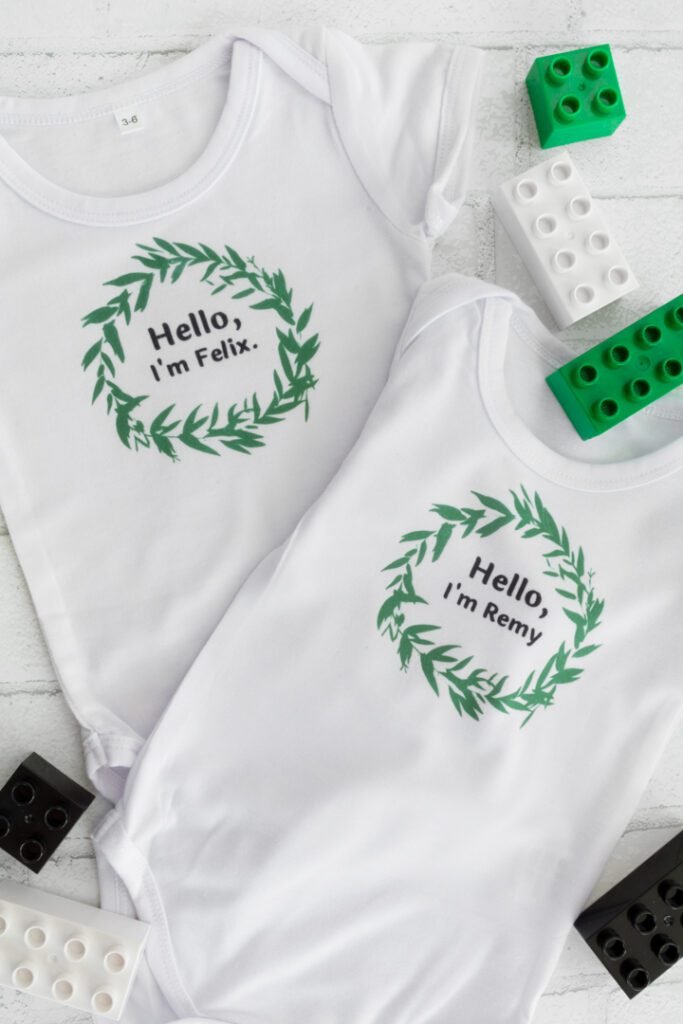
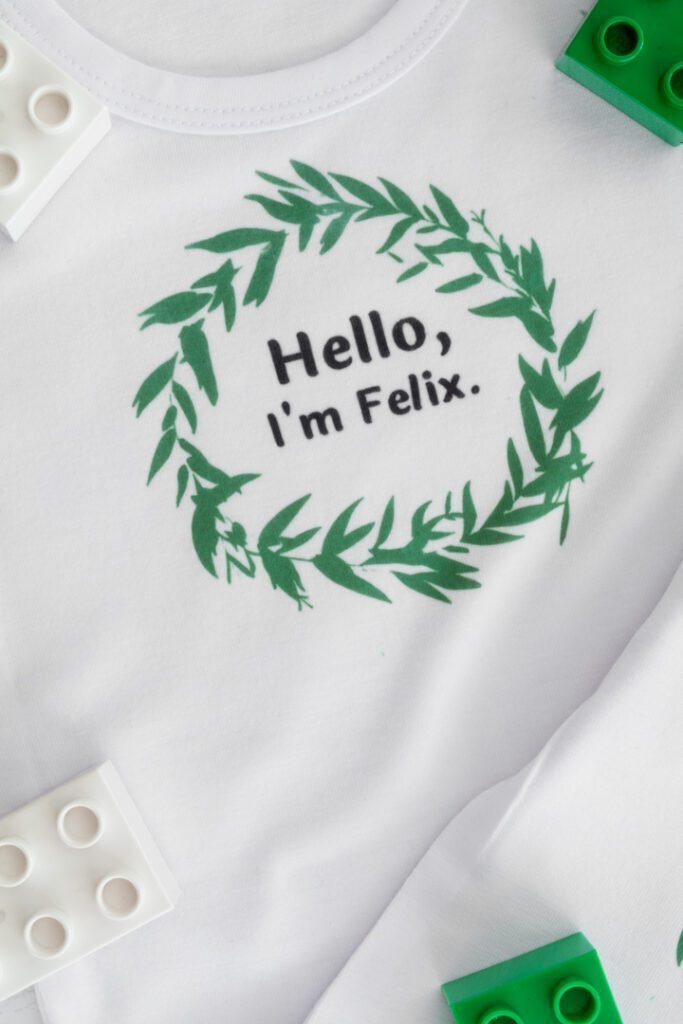
    And here are the finished DIY twin coming home outfits!

    I am SO happy with how these turned out. Except that when I started uploading some of these photos…I realized that the period fell off of the end of “Remy” sometime between weeding the design and transferring it! Did you guys notice that?! I’ve been a copyeditor for 8 years at my day job now…so it is killing me!

    But not enough to remake them. That’d be super wasteful…and these designs took a while to weed 🙂 All told, they do look very professional thanks to the Infusible Ink, and I’m really excited to see these on Allison’s boys.

     %postname%  %postname%

    Share my ideas for DIY Twin Coming Home Outfits on Pinterest!

     %postname%