This content may contain affiliate links. See my full disclosure here.
Wondering how to take styled overhead images for your blog or social media profiles? Here’s how to get gorgeous results with minimal gear! Take your photography to the next level by learning a few simple lighting tricks.
If you’re at all involved in the blogging world, you’ve probably heard of styled stock photography or seen beautifully styled overhead photography. But what is it? You probably know what a stock photo is; the Internet says that stock photos are “photographs of common places, landmarks, nature, events, or people for commercial design purposes.”
Basically they are just pictures of things. Stock photos can be really good, or they can be really funny and unexplainable. Really, the only difference between stock photos and styled stock photos is that styled stock photos are styled with a certain theme.
Styled stock images are also often shot overhead, meaning from above. You often see items laid out on a neutral surface, table, desk, or bed and shot from overhead. They can be great options to help with branding on your social media profiles, or they can be strategically shot so you can slap an inspirational quote on top of them in Canva. 🙂

If you want to purchase gorgeous, professional styled stock photos to help brand your online presence, there are TONS of options out there. But, if you want to practice styling your own photography, I’m going to give you some great tips on how to use light to make your photos look better.
- Decide on a backdrop. What will you arrange your items on? Will the color and texture complement your theme? Speaking of…
- Pick a theme. I looked around my house and gathered a bunch of items that I thought would photograph well. I did two sets of sewing-themed images and two sets of beauty-themed images. All items came from my craft closet or my bathroom.
- Sort items into complementary colors. The first sewing photo is pink/black/white; the second is gold/yellow/purple/brown. The first beauty image focuses on pinks/blacks/golds, while the second focuses on bright colors like red and purple.
- Arrange and rearrange to try different layouts. It’s hard to know what will look best until you see the photos on your computer.
Now that you have your items all sorted out, let’s talk about the most important parts, which are lighting and gear. A beautiful theme will look like crap if you don’t light your photo the right way, and there are a few things you need to do that.


- An Ikea Lack side table in Birch Effect—this table comes in a handful of colors, all of which are only $10. You can also just use the floor!
- Natural light (e.g., a window)
- Two pieces of white, poster-board-sized foam
- A reflector (I have this one) (you could also use a third piece of white poster board, but a reflector is best IMO
- Things to prop your reflector and foam up on (I used a few chairs and stood on one of the chairs to take the photos—see purple socks below).
- If you’re smart and take photos from overhead regularly, a tripod with an arm…but I didn’t have one when I originally wrote this post. As I update it years later, I gotta say…invest in a tripod with an arm!
My natural light source is our sliding glass door on the right. It was an overcast day, but if you’re working with direct sun, you might want to use a diffuser or a makeshift diffuser (like a piece of sheer white fabric). Place your reflector opposite the natural light source; I had mine leaning up against a chair.
The reflector fills in the shadows by bouncing (or reflecting) light from the window onto the subject. Then, put your two white foam boards on the remaining two sides. I had them each propped up against a chair, and I stood on one of the chairs to take the photos.
(Again, as I update this post, I gotta reiterate that it’s much easier to get a tripod with an arm if you’re planning to do a lot of photography. If not, you can set up your shots on the floor so you don’t have to stand on a chair.)

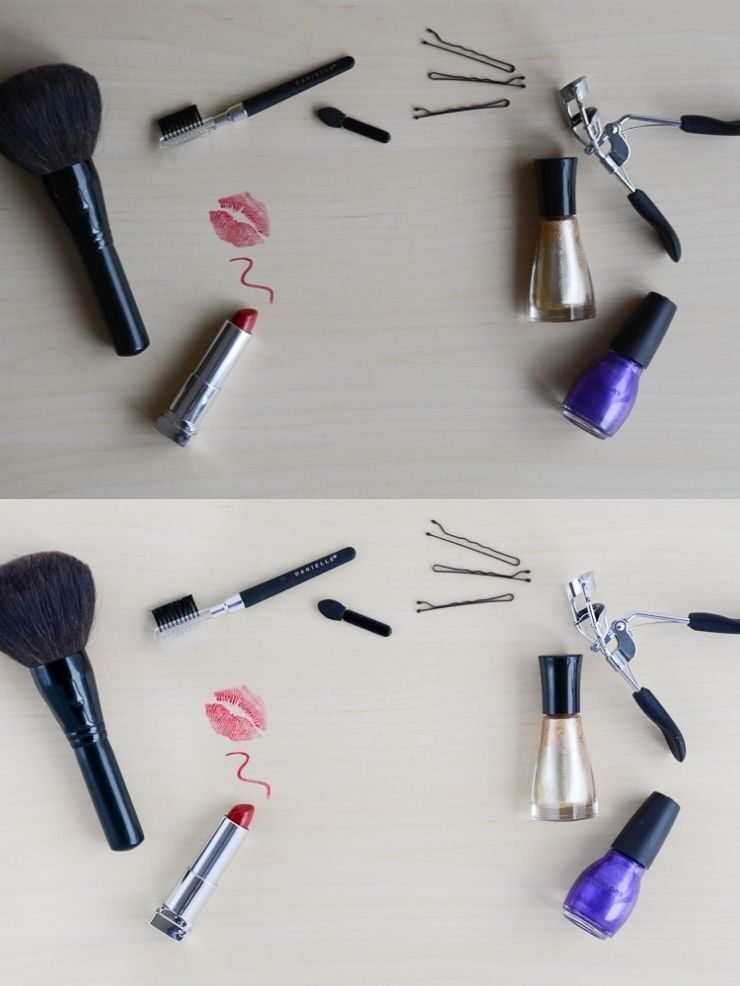
You’re probably wondering how much of a difference this setup really makes. Lucky for you, I took before and after photos for each theme. The before (first, darker) photos only have the natural light source on the right; they do not have the reflector or the two foam boards.
The after photos have the natural light source, the reflector, and the two white foam boards. I also brightened them a bit and saturated some of the colors. (Note: I use Adobe Lightroom, but there are plenty of amazing free photo editing apps out there. Snapseed is my favorite for mobile.)
As you can see with these, the lighting makes a huge difference! I’m pretty pleased with how much of an improvement the reflector and two white foam boards made. With a little experimenting, you can take professional-looking styled stock photos for your own blog.


Like this? Check out my tutorial for making homemade eucalyptus and lavender salt scrub, my baked bath salts recipe, and my pretty resin and wood serving tray.
Pin my tutorial on how to take styled overhead images!


0 Comments