Learn how to make rainbow homemade bath salts, a fun and easy DIY that makes a great gift!
I love bath salts. The only thing I dislike about our current apartment is the fact that we have a small bath tub–but that doesn’t stop me from using it. I usually mow through bath salts, so I started making my own after realizing how much cheaper it was to make my own. I also like to use a mixture of half Epsom and half sea salt, and most store-bought salts I’ve found are either 100% Epsom or 100% sea salt.
While I usually make colorless bath salts for my own personal use, I like to add color to them when I’m giving them as a gift because it makes them look more presentable. These rainbow homemade bath salts make a fun craft for a great gift, and I can make them in about an hour.

I had the baking soda, measuring cups, baggies, mason jar, and food coloring, but I was due for some more Epsom salt and sea salt. I picked up both at my local grocery store. A 4-pound bag of Epsom salt was 4.79 (save a trip here); I used 8 ounces for this project, which is about 60 cents. A 22-ounce can of coarse sea salt was 1.79 (save a trip here); I used 8 ounces for this project, which is about 60 cents as well.

(Don’t use any ingredients you’re allergic to, and always spot test new ingredients to make sure you don’t have a reaction to them. Do not use any homemade products without consulting with an appropriate medical professional first.)
First I measured my ingredients. I measured just a bit under 1 cup Epsom salt and 1 cup sea salt. Then, I measured about 1/8 cup baking soda. The goal was to have 2 cups total when I mixed the Epsom salt, sea salt, and baking soda. Then, I dumped the mixture into one of my plastic baggies, shut the bag securely, and mixed everything in the bag up thoroughly.
Note: I added 10 drops of peppermint essential oil because I love that scent. To mix, I simply dropped my desired amount onto the salts; then, I shut the bag securely and mixed everything up again.

Blanche offered her unsolicited supervision:

Like this DIY lemon scrub? Check out my DIY eucalyptus salt scrub recipe, my baked bath salts recipe, and my DIY honey and beeswax lip balm!
Next I split the mixture up into different Ziploc baggies. Dividing 2 cups (the total mixture) by 7 (the number of Ziploc baggies) gave me a nasty number. So I decided to eyeball the amount I thought should be in each bag and then compare. It isn’t an exact science. I just wanted each bag to have roughly the same amount. Then, I added color to each baggy.
I started with red food coloring and simply added drops, shut the bag securely, mixed, checked the color, and repeated if necessary. I knew I could always add more drops of each color, but I couldn’t take drops away once I’d added them.


Next I poured the salts into the jar. I used a spoon to even out each layer a bit. Think of this like sand art.
Once I’d finished pouring the salts, I just screwed the top back on and admired my handy work. I had already put a sticky label on my lid when I took this photo. I got a 6-pack of labels at my local Jo-Ann.
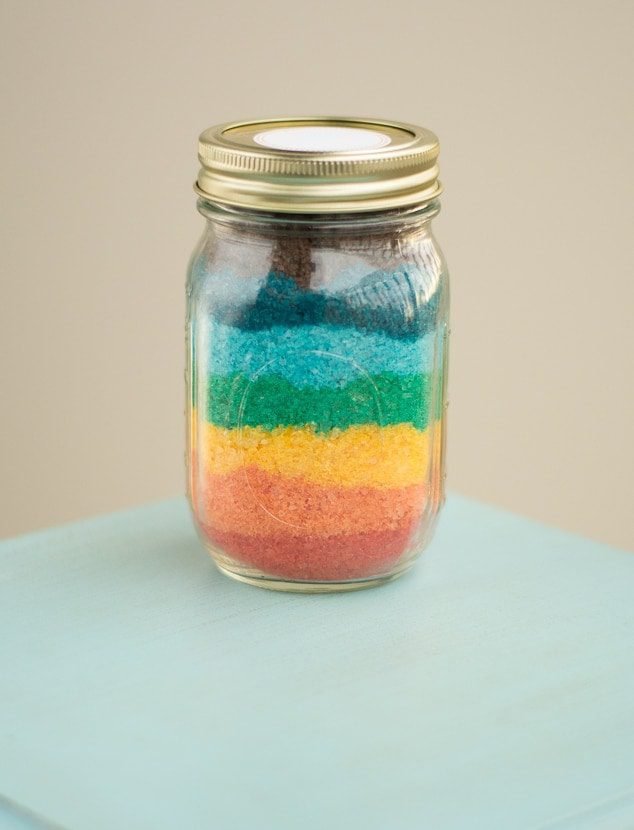
After about 24 hours, my colors started to bleed into one another. Each color stripe now starts fading into the next color. Depending on the type and amount of food coloring used, this is important to keep this in mind. Also, if the salts are packed into the jar tightly, there will be more color bleeding.
I was originally worried about whether or not the coloring would dye a bath tub, so I did a test. The small amount of salt is diluted by the amount of water in the bath tub, so it should be fine. If you’re worried, you could test yours or make your colors lighter. Here are pics of the test I did. I used almost all of the purple salt and let the tub sit for about 20 minutes. You can see how diluted the color is in the bottom left photo.
To prevent color bleeding for even longer, check out how to bake bath salts in this post.
Pin my post about how to make rainbow homemade bath salts!


0 Comments