Need a last-minute Halloween costume? My DIY pineapple costume for my toddler is quick and easy—and includes the steps for an easy pineapple headband DIY. Learn how to make it!
I’m really excited about R’s halloween costume! It’s a pineapple. Inspired by her hair. 🙂 And it’s an easy DIY costume that you can make yourself even if you don’t have a lot of crafting skills or supplies.
I’m using my Cricut and EasyPress collection for a lot of it, but that’s only because I have them. I want this idea to be accessible to folks who don’t have those supplies, so I’m providing alternative ideas as well (e.g., black electrical tape instead of iron-on vinyl, household iron instead of an EasyPress). So let’s chat about how to make this costume.

- Medium green scrapbook paper, 1 sheet
- Light green scrapbook paper, 1 sheet
- Brown scrapbook paper, 1 sheet
- Green sparkle scrapbook paper, 1 sheet
- Scissors and quick-drying glue
- Painter’s tape
- Disposable paper cup
- Yellow long-sleeved shirt
- Black vinyl iron-on or black electrical tape or black fabric pen
Let’s talk about the pineapple costume headband DIY first. This is the first half of the costume, because what would a pineapple costume be without an ostentatious pineapple topper headband? So let’s jump in.
For the first step, I grabbed a disposable paper cup that I’d been storing things in in my craft closet. I used scissors to cut the bottom out and then started cutting leaves. For the first layer of the leaves, I used the medium green scrapbook paper.
When I first started cutting the leaves, I cut them out in more of a triangle-like design (second pic below), and then trimmed in the bottom of each to make it look more like a leaf. I didn’t use a template—just winged it. Next I applied fast-drying glue to the bottom of each leaf and taped it on using FrogTape.
I used FrogTape because it is easier to remove than regular clear tape. I wanted to use something to hold the first layer of leaves in place while the glue dried, though. First I did one full layer along the entire base of the disposable paper cup. I used my fingers to slightly curl each leaf outward.


To help ensure this first round of leaves stuck to the cup completely, I also applied a bit of glue midway up each leaf—not just at the bottom. I did a row of the FrogTape here as well to keep the leaves in place while the glue dried.
However, once I removed the FrogTape from the paper, I have to be honest…it pulled a bit of the scrapbook paper off! But that’s okay. I had many, many more layers of the pineapple costume headband planned.


Okay, so for the second later I focused on the glitter green paper. I cut out a bunch of just slightly smaller leaves to add to the base layer. Since the base layer of leaves was set, this was an easy step.
I used some tiny clothespins I had on hand (because I’m a weirdo). But if you’re normal and don’t have these, you can just use binder clips, regular clothes pins, or paper clips.


Once the main body of the pineapple headband was done—the first two layers—it was time to add the embellishments. I basically just cut out smaller leaves from the remainder scraps of the medium green and glitter green paper. Then I cut thin strips of the brown scrapbook paper as an accent.
Since the first two layers of the headband was done and secure, most of these pieces we were able to add the glue and just stick the pieces in place to dry without using pins or anything to keep them still. So this was very easy. I also used my fingers to curl each pieces I glued before I glued them on. All pieces curled out.
I stuck the pieces all over—between the cup and the first layer and between the first and second layers. I didn’t overthink this. Just stick pieces in areas where the headband looked bare.


And since I had some leftover light green paper, I added it on the inside of the cup just to help disguise the inside white portion of the cup. Looks lovely completed!

So to attach the pineapple topper, I initially wanted to use a headband. In fact, like a crazy person, I ordered a 20-pack of headbands on Amazon. (Honestly, why can’t you just buy ONE plain toddler headband at Target? Why do you need 20?)
They are beautiful and nice quality, but I quickly realized that gluing the pineapple topper to the headband would not be stable enough for an energetic toddler that would probably be bopping around. It also seemed to make it quite the apparatus and might bother her. She’s not a huge fan of headbands.
So I decided to cut three strips of cardstock, fold them over lengthwise to make them a bit thicker, and glue them onto the pineapple topper. I glued them on the inside and folded them out under the topper so that they were sticking out like tabs.
Then, the plan was to put her hair up in a ponytail on top of her head to make a secure space. And use hair clips on the “tabs” to clip the topper in place.

I used vinyl iron-on and my EasyPress/EasyPress Mini for my design. You can use a household iron if you want to use iron-on. If you want to use something less permanent, you can use adhesive (not iron-on) black vinyl or even black electrical tape!
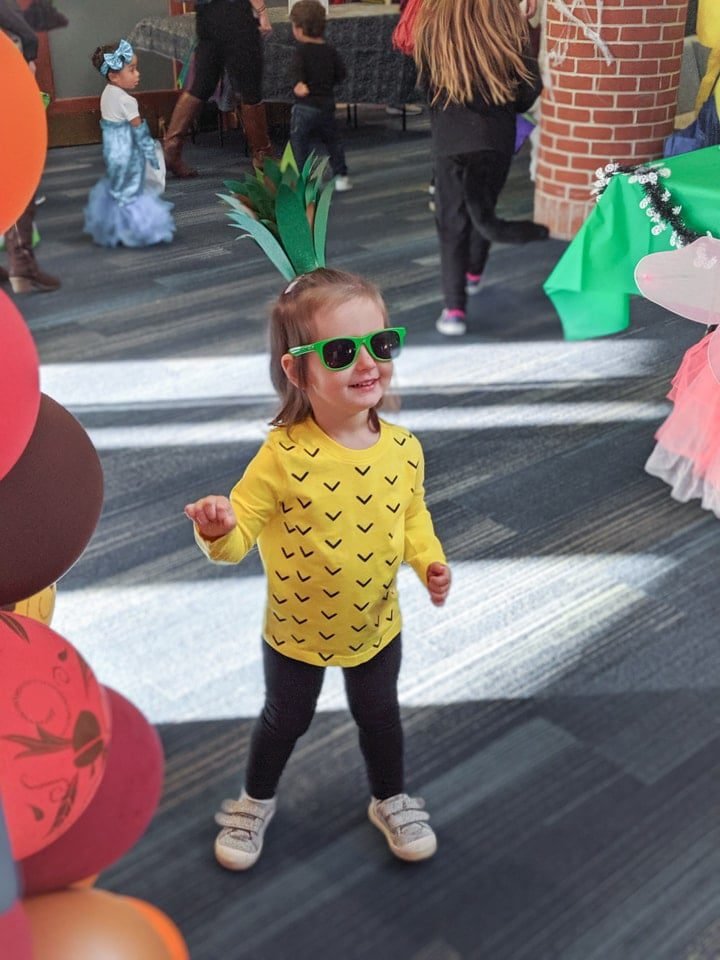
I used a yellow long-sleeved shirt from Primary. They have the best solid-color kids clothes. We love them for R’s normal wardrobe, so a Primary shirt for her costume was a no-brainer. Also, a bright yellow shirt is kind of hard to find in October. 🙂
For more Cricut, check out my posts about how to use the Cricut EasyPress 2, as well as my tutorial on how to use the Cricut EasyPress Mini!

I used my Cricut to cut a series of V’s on one sheet so that I could apply it all at once and save time. If you don’t have a Cricut, you can cut out Vs by hand. First I focused on the main area of the shirt. This was two parts: the bottom and the smaller top area.


Once I was done with that, I began filling in the bare spots using stray V’s. I used my Cricut Easy Press Mini for this just because it made life easier, but if you don’t have one, you can easily use a household iron.
What do you think? I think the DIY pineapple shirt turned out pretty good! I decided not to do the sleeves and the back of the shirt. Honestly I didn’t think it would add that much, and it would have been a pain. So I’m calling this good as is. 🙂


Want more kiddo projects? Check out my DIY scrapbook paper and yarn party hats, my dollhouse bookcase build, my unicorn bookends, and my no-sew felt name garland!
We paired the yellow shirt with a pair of plain leggings from Carter’s. We love their leggings, so I got a two-pack with black and white. Honestly, I’ll probably dye the white leggings after Halloween…there is literally zero chance white toddler leggings will not be stained about 15 minutes.
Oh, and the sunnies were not planned as part of the costume, but they totally work! They were in her diaper bag, and she’s going through a major sunnies phase right now. They are from the Dollar Store. 🙂


Share my DIY Pineapple Costume on Pinterest!


0 Comments