This post shares all about how to use Cricut Infusible Ink on coasters, including an overview of what Cricut Infusible Ink is, how it works, and how you can create a professional project at home using the Cricut brand coaster blanks! This post also contains affiliate links, which you can read more about here.
Let me tell you what. I am amped to finally be trying out Cricut’s newest addition to their materials—Infusible Ink. Some of my friends had early access to trying it out, and I’ve been loving the projects I’ve seen.
Today I’m sharing everything I’ve learned about Infusible Ink so far and walking you through the step-by-step process of creating an Infusible Ink project using the Cricut square coaster blanks. Let’s chat about the ink first.
Cricut’s new Infusible Ink allows you to create professional-quality ink-based heat transfers at home. They create similar-looking products to the more traditional iron-on vinyl. However, the major difference is that while iron-on material is attached to the top of a base material using melted adhesive, Infusible Ink becomes part of the material.
The sheets aren’t wet or messy like you might imagine. They come packaged in a solid state. When you apply heat at the right temperature, the ink turns into a gas and transfers cleanly to your design. The ink becomes solid again and is immediately dry. (Though it might be hot to the touch because of the heat transfer.)
Since the ink becomes part of the base material, the transfer is seamless and never peels, wrinkles, or cracks through use and washing. (Though I’d imagine it fades after long periods of time and a lot of washing, much like any piece of clothing.) The ink comes on transfer sheets that look a lot like a sheet of vinyl or paper, and they come in patterns and solid colors. There are also Infusible Ink pens for creating your own designs by hand.

You might be wondering why you’d choose Infusible Ink over iron-on or heat transfer vinyl. Especially since Infusible Ink is more expensive. Here are a few guidelines to use when choosing whether or not Infusible Ink or iron-on/HTV is the best option.
- Iron-on can be applied to many surfaces, while Infusible Ink products should be used only with compatible blanks. This limits what you can use. Infusible Ink can’t be used on 100% cotton, either, if you have a clothing preference.
- Iron-on can be applied to any color garment. Infusible Ink should be used only with compatible or light-colored fabric.
- Infusible Ink requires an EasyPress (or a heat press that reaches 400 degrees Fahrenheit). I highly recommend using an EasyPress for iron-on/HTV products, but you can use a household iron in a pinch.
- Iron-on comes in a seemingly endless array of prints and decorative finishes like glitter, holographic, and shimmer. Infusible Ink is more limited, but the colors and print available are truly beautiful. And it’s likely more will roll out as demand increases.
- Infusible Ink is designed to last about a year when stored properly (before you transfer it!). Iron-on doesn’t have a short shelf life like that.
So, this list makes it seem like iron-on/HTV is your best bet. So why use Infusible Ink at all? Because, my friends, it’s permanent. It’s professional. It’s polished. It never cracks, peels, or flakes like iron-on/HTV can when it begins to wear. It’s just really freaking cool.

New to Cricut? Check out my detailed Cricut machine overview post covering the differences between the Cricut Joy, Cricut Explore Air 2, and Cricut Maker! I also have a detailed guide for using the EasyPress 2 and EasyPress Mini, as well as the Cricut Mug Press!
One of the things that was really confusing to me when I first started learning about Infusible Ink was the “blanks” concept. I know what blanks are…but I wasn’t used to having to use special blanks for projects. Infusible Ink can’t just be used on any blank.
Cricut’s Infusible Ink works by infusing directly into the fibers of blanks. There is no adhesive. But it needs certain types of fibers to infuse properly. Because Infusible Ink is on the pricier side, Cricut guarantees best results only when using Cricut-brand blanks design for Infusible Ink.
In fact, they say the following: “Infusible Ink designs are guaranteed to create permanent transfers on all blanks bearing the Infusible Ink compatibility badge.” Right now Cricut has tote bags, coasters, baby bodysuits, and men’s, women’s, and kids’ shirts. They plan to gradually roll out more blanks designed for use with Infusible Ink, including things like notebooks, key chains, dog tags, and more.


I mean, I’m not going to tell you how to live your life, but I am going to tell you Cricut’s official guidance 😉 And that is to use Infusible Ink designated blanks. This isn’t to say that you can’t buy your own blanks and use Infusible Ink on them. It’s just to say that it might not work as intended.
The Infusible Ink heat-transfer sheets require polymer or polyester-based blanks to enable a permanent bond. I have heard rumors saying that you can use Infusible Ink on sublimation-compatible blanks. I haven’t tested this yet. Whatever you do, if you’re trying to use Cricut Infusible Ink on a regular shirt, know that Infusible Ink will not transfer to 100% cotton. Don’t bother trying it.

Infusible Ink projects are optimized for use with Cricut’s EasyPress. If you have access to heat press that reaches 400 degrees Fahrenheit, you can use that, too. You unfortunately might get varied results using Cricut’s original EasyPress, though. It could take longer and may not result in as vibrant colors.
Getting the best results with Infusible Ink requires precise heat transfer settings—both temperature and time. Using the EasyPress and Cricut’s Heat Transfer Guide tells you exactly what to do, which will result in the most vibrant colors possible.
As with all EasyPress projects, Cricut recommends the EasyPress mat. Honestly, if you’re going to invest in an EasyPress, I wouldn’t cheap out on the mat. They are pretty cheap and very handy. Unlike a towel, the mat helps appropriately distribute and direct heat to the Infusible Ink design during the transfer.
Cricut also doesn’t recommend making an Infusible Ink design that is larger than your EasyPress’s heat plate. That’s because Infusible Ink should receive only one heat application. If you try to move your EasyPress around, you might overheat or underheat some areas.

I’m not going to talk a ton about the Infusible Ink pens and markers because I won’t be using them for this tutorial. But there are a few points worth mentioning. These pens and markers are essentially the same as the Infusible Ink transfer sheets, but the process of using this is a bit different.
- They use a heat-activated process to bind the ink with the compatible blank.
- Unlike fabric pens, they don’t wrinkle, crack, flake, or bleed over time.
- Each pen lasts a minimum of four full 8.5” x 11” pages of writing/drawing.
So here are the differences. Cricut does not recommend using the Infusible Ink pens and markers to draw directly onto a compatible blank or directly onto Infusible Ink transfer sheets. Instead, you’ll need to create your design on laser copy paper.
The pens fit in your machine just like Cricut’s normal writing pens do. So you can put the laser paper on a light grip mat and have your machine draw for you! Remember to mirror. This piece of paper is then used to transfer the design.
Laser paper is ideal because it can handle high heat and it has a coating that helps prevent ink bleeding. You can use heat-resistant tape to hold your design in place. Even minor shifting could blur the transfer. Also keep in mind that the colors might look dull on the piece of laser paper. They’ll perk up when transferred.


Absolutely! If you want to layer Infusible Ink over Infusible Ink keep in mind that the colors will blend where the sheets overlap. Cricut recommends using a “slice and set” technique. Here’s a great video tutorial to walk you through it. Also, apply the darkest colors last.
If you want to lay iron-on vinyl and Infusible Ink, you’re in luck. You can do that, too. Just make sure Infusible Ink is the bottom layer. Never layer Infusible Ink on top of the iron-on. It won’t be able to set properly, and it might damage the iron-on by overheating it.
Now I want to show the Infusible Ink in action! I was so excited to start this project you guys. I decided to make plant-themed coasters because, obviously. So here’s how to use Cricut Infusible Ink on coasters!
SUPPLIES

Want more Infusible Ink? You’re in luck! I have posts on using Infusible Ink on a women’s t-shirt, creating a customized Infusible Ink tote bag, personalizing cosmetic bag and pillowcase blanks, and making personalized baby bodysuits.
Personalize your cut file as desired and cut it using your Cricut and Design Space. I cut a few plant-lady-themed designs I mocked up using the free commercial use font Certhas and a few free images from Canva. You can download the free .png files I used here!
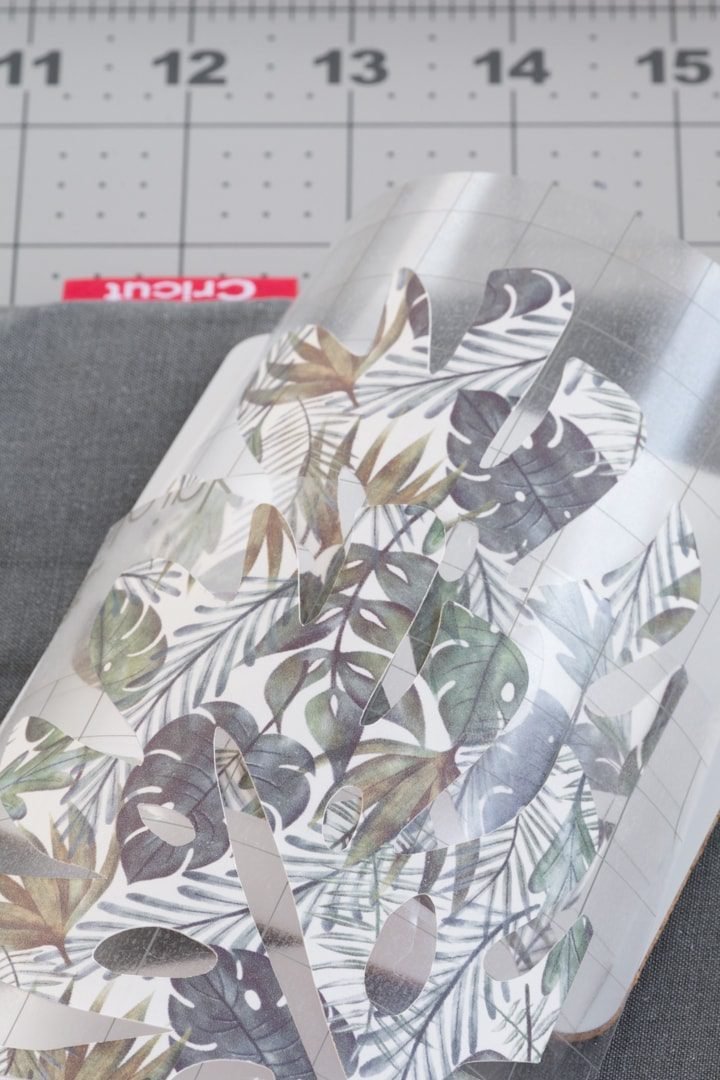
The transfer sheet should be placed liner side down on a green StandardGrip mat. Make sure to mirror the design! Load mat and let your Cricut do the cutting for you for whatever design you’re making.
When your cut is done, remove the transfer sheet from the mat carefully. Trim excess off and then find a spot where the transfer paper has started to separate at a cut. Use tweezers to remove negative pieces from your design.
I wasn’t sure which part of my designs I wanted to be the negative space on some of these, so I just rolled with it and chose whatever came off first. 🙂 Just make sure to leave the design you want to imprint on the coaster on your liner!
Make sure your leftover clear liner isn’t larger than your EasyPress’s heat plate. Also, no worries if your machine cuts through the liner in some spots. The sheets are very thin, and the design will still transfer fine.


Preparing your square coaster blank will help you achieve the best possible transfer results. First, put your white cardstock on your EasyPress Mat. Then use a lint-free cloth to wipe down your coaster. A lint-free cloth is very important, because a regular cloth probably has some lint on it even if you don’t see it! The ink infusion process will press the lint into the blank and cause blue speckles in your design.
Place your design face down on the coaster, then cover it with a fresh sheet of butcher paper. Butcher paper comes with the Infusible Ink transfer sheets and must be larger than your EasyPress’s heat plate.
Note: Cricut does not recommend reusing butcher paper because it absorbs ink that is lost in the transfer. This ink may then get on other projects, your EasyPress’s heat plate, or your mat.


Use Cricut’s EasyPress heat guide to figure out what temperature to set your EasyPress to, as well as how long to apply heat. If you have a large EasyPress, you can transfer designs to multiple coasters at once, too.
While you’re applying heat with your EasyPress, don’t move a muscle! Everything must stay completely still. When the time is up, carefully remove the butcher paper and transfer paper liner. Use tweezers to remove any part of the design that separated from the liner. Don’t use your fingers—if could result in smudging.
Note: The designs are not reusable. Once you transfer the design, you gotta chuck it. Even though it looks like it’s still usable, the magic has happened. Sorry!


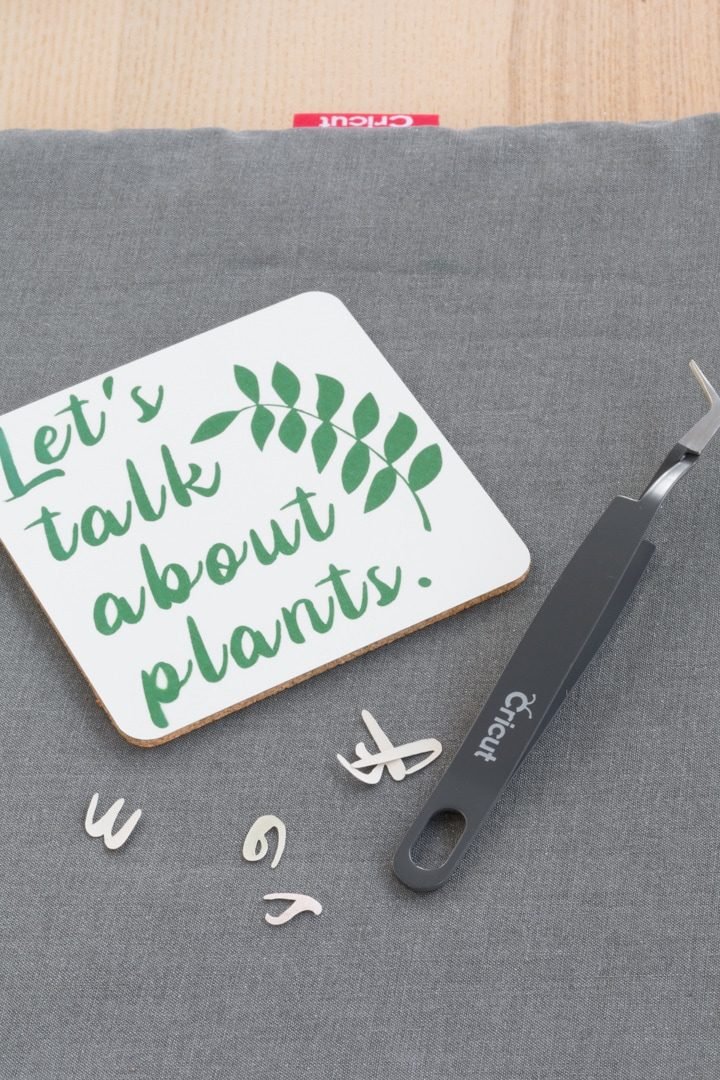

To care for your neato new coasters, wash them with warm water and glass cleaner. Don’t use anything rough on them. How beautiful did these turn out? The colors are stunning, really. Cricut isn’t lying when they say the colors are dull on the sheets but vivid once they are transferred.
I’m excited to try out a few more colors and patterns to see how they turn out, too. Also excited to try these Infusible Inks on some of the fabrics—Cricut’s tote bags and shirts. As well as a few non-Cricut-branded blanks to see how things pan out!


Share my post about how to use Cricut Infusible Ink on Coasters!


0 Comments